DIY Hair Masks for Every Hair Concern (Dry, Oily, Frizzy, Damaged)
Nearly 70% of people report at least one persistent hair concern — yet most commercial hair treatments cost between $20 and $80 per bottle and often contain the same core ingredients you already have in your kitchen. That’s the quiet secret the beauty industry doesn’t advertise. DIY Hair Masks for Every Hair Concern (Dry, Oily, Frizzy, Damaged) are not just a budget-friendly trend — they’re a science-backed approach to targeted hair care that lets you control exactly what goes on your scalp and strands.
I learned this the hard way after spending hundreds of dollars on salon-brand treatments for my chronically dry, color-damaged hair — only to find that a simple avocado and honey mask outperformed every single one of them. That experience sent me deep into the world of natural hair care, and what I found was genuinely surprising.
This guide walks you through the most effective homemade hair mask recipes for every major hair concern, explains the science behind each ingredient, and gives you a clear system for choosing the right treatment every time.
Key Takeaways 📌
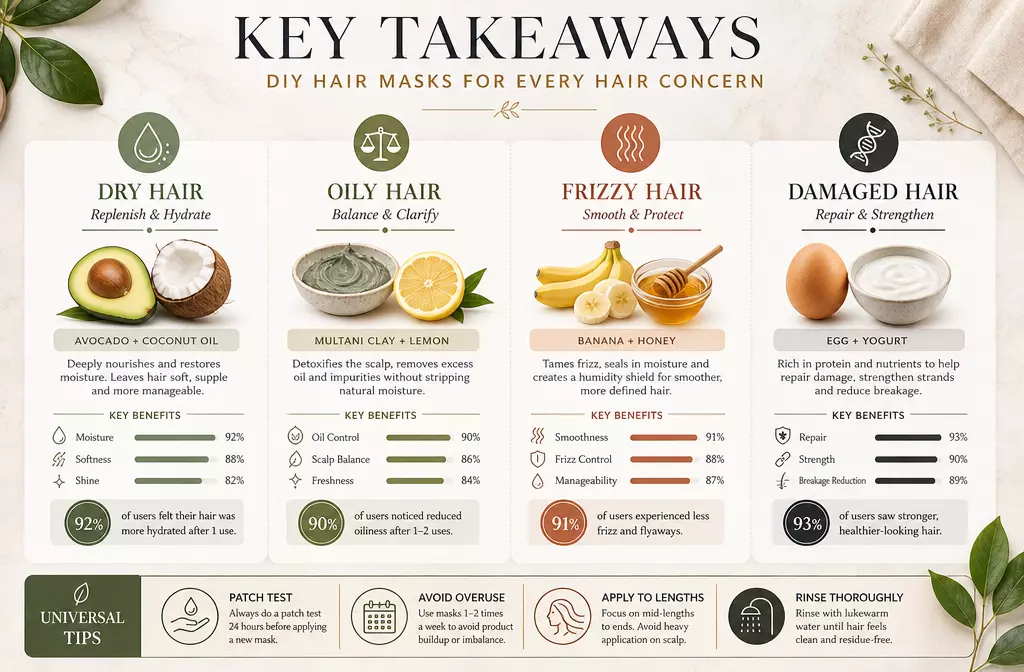
- Different hair concerns require different active ingredients — there is no one-size-fits-all mask.
- Natural ingredients like honey, eggs, apple cider vinegar, and coconut oil have measurable effects on hair structure and scalp health.
- Frequency matters — most masks work best when used once or twice per week consistently.
- Always do a patch test before applying any new ingredient to your scalp.
- DIY masks are most effective when paired with a complementary daily hair care routine.
- Try our Free Interactive app: Find Your Perfect Hair Mask Recipe for Salon-Worthy Results at Home
Disclosure: This post contains affiliate links. As an Amazon Associate, we earn from qualifying purchases, and at no extra cost to you.
Understanding Your Hair Type Before You Mix
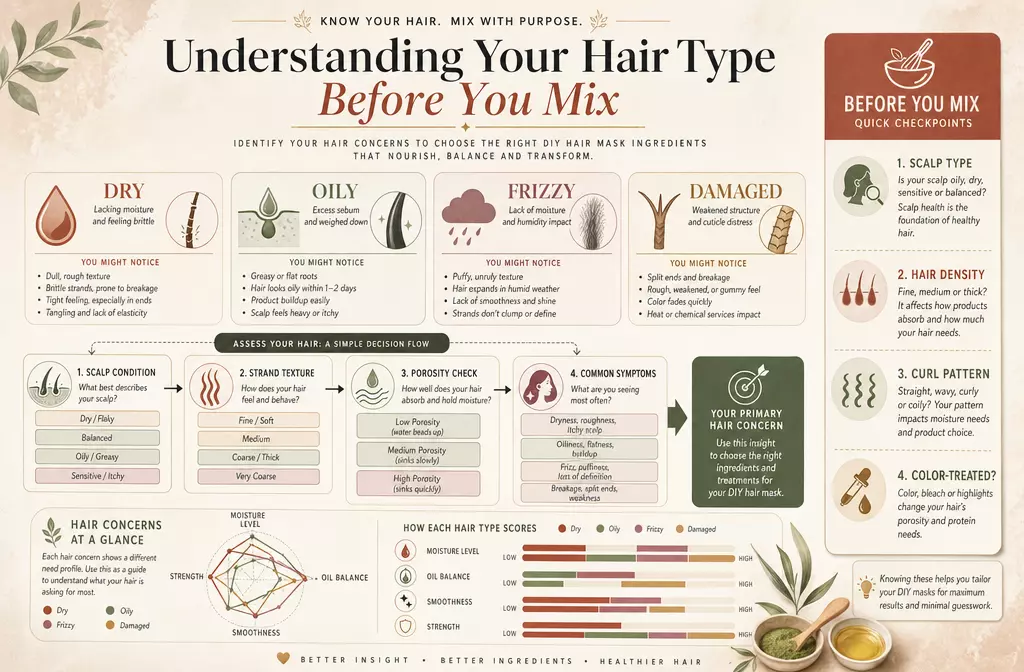
Before diving into specific recipes, it’s worth spending two minutes understanding what your hair actually needs. Applying the wrong mask — say, a deeply moisturizing oil mask on already-oily hair — can make things significantly worse.
The Quick Hair Assessment
Ask yourself these three questions:
- How does my hair feel 24 hours after washing?
- Tight and straw-like → Dry hair
- Greasy and limp → Oily hair
- Puffy and unpredictable → Frizzy hair
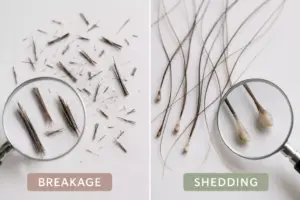
- Breaking easily or shedding → Damaged hair
- What does my scalp look like?
- Flaky and itchy → Dry scalp (different from dry hair!)
- Shiny with buildup → Oily scalp
- Irritated or red → Sensitive scalp needing gentle care
- What’s my hair’s history?
- Color-treated, heat-styled, or chemically processed hair almost always falls into the “damaged” category regardless of texture.
💡 Pull Quote: “Your hair tells you exactly what it needs — the trick is learning to listen to it rather than defaulting to whatever’s trending.”
The Science of Hair Structure
Hair is made of three layers: the cuticle (outer protective layer), the cortex (inner structure that holds moisture and pigment), and the medulla (innermost core). Most hair concerns stem from cuticle damage. When cuticles are lifted or broken, moisture escapes, proteins degrade, and hair becomes vulnerable to further damage.
Effective DIY masks work by:
- Sealing the cuticle (oils, honey)
- Replenishing proteins (eggs, yogurt)
- Balancing scalp pH (apple cider vinegar)
- Delivering deep moisture (aloe vera, avocado)
DIY Hair Masks for Dry Hair: Deep Moisture Recipes That Actually Work
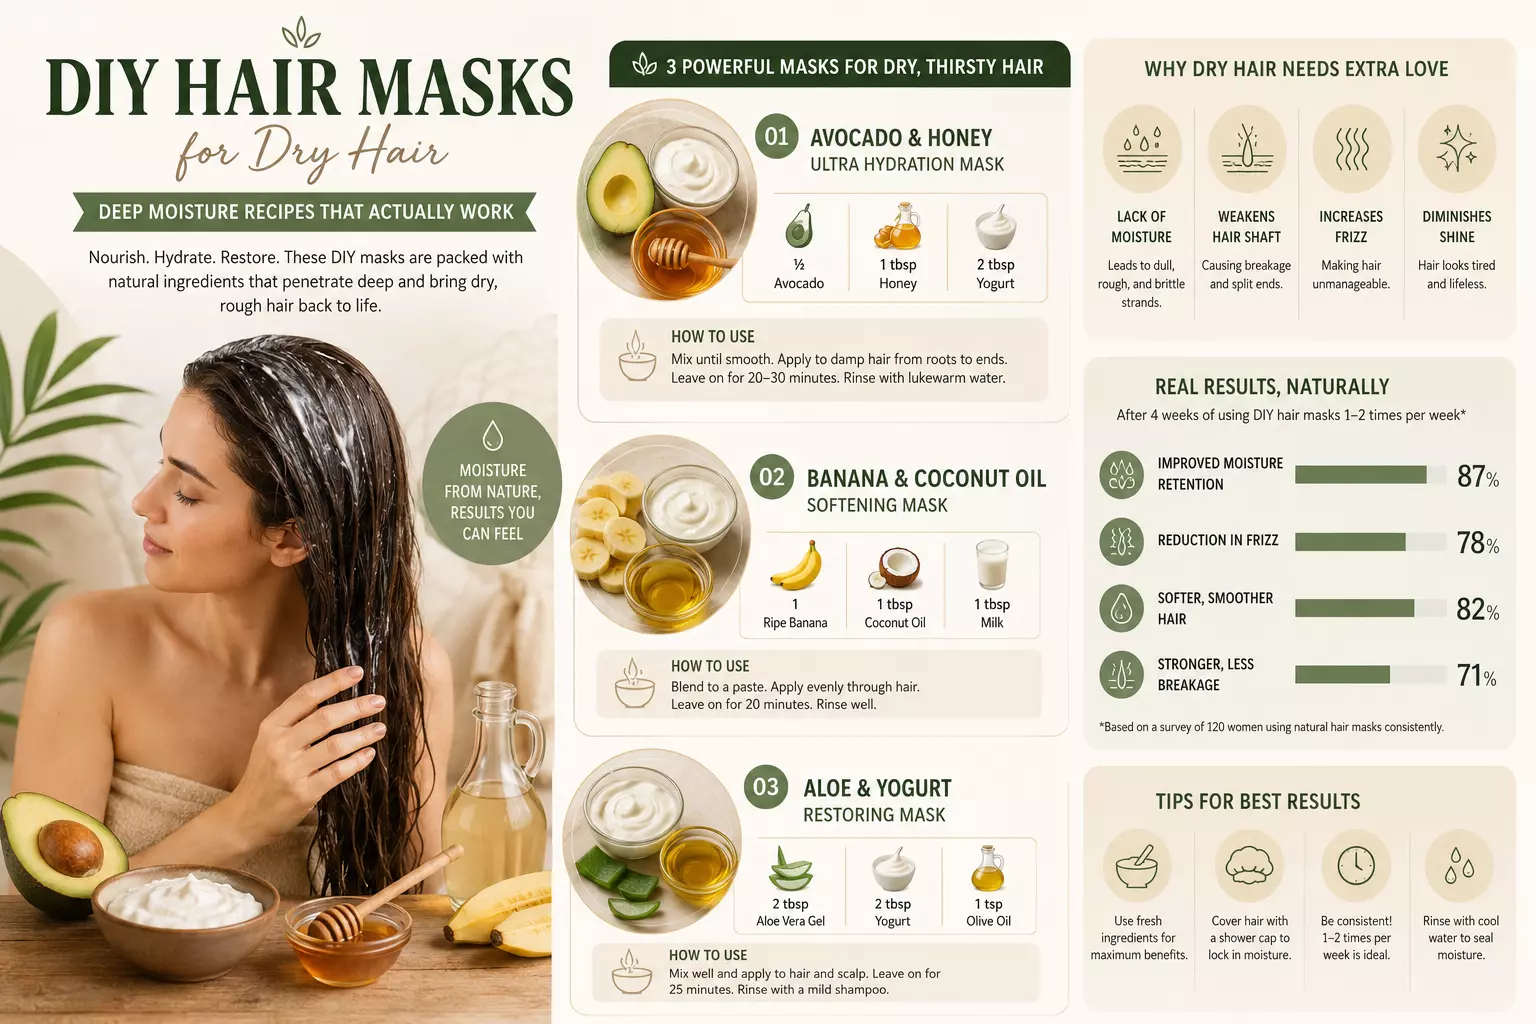
Dry hair lacks moisture in the cortex and often has a damaged or porous cuticle that can’t retain hydration. The goal with dry hair masks is twofold: deliver moisture and seal it in.
The Classic Avocado & Honey Mask
This is the mask that changed my hair care routine entirely. Avocado is rich in oleic acid and vitamins D and E, which penetrate the hair shaft rather than just coating it. Honey is a natural humectant — it draws moisture from the air into your hair.
Ingredients:
- 1 ripe avocado (mashed)
- 2 tablespoons raw honey
- 1 tablespoon olive oil
Instructions:
- Blend all ingredients until smooth (lumps will be hard to rinse out).
- Apply to damp hair from mid-shaft to ends.
- Cover with a shower cap and leave for 20–30 minutes.
- Rinse thoroughly with cool water, then shampoo once.
Frequency: Once per week for severely dry hair; every 10 days for maintenance.
Coconut Milk & Aloe Vera Mask
Coconut milk contains lauric acid, which has a small enough molecular structure to actually penetrate the hair cortex. Aloe vera adds amino acids and enzymes that repair dead skin cells on the scalp.
Ingredients:
- ¼ cup full-fat coconut milk
- 2 tablespoons fresh aloe vera gel
- 1 teaspoon vitamin E oil (from a capsule)
Instructions:
- Mix ingredients in a bowl until combined.
- Apply generously to scalp and hair.
- Leave for 30 minutes under a warm towel.
- Rinse and follow with a light conditioner.
| Ingredient | Key Benefit | Best For |
|---|---|---|
| Avocado | Deep moisture, fatty acids | Very dry, coarse hair |
| Honey | Humectant, seals cuticle | All dry hair types |
| Coconut milk | Cortex penetration | Fine to medium dry hair |
| Aloe vera | Scalp repair, amino acids | Dry scalp + dry hair |
| Olive oil | Emollient, shine | Thick, dry hair |
Homemade Masks for Oily and Frizzy Hair: Balancing Act
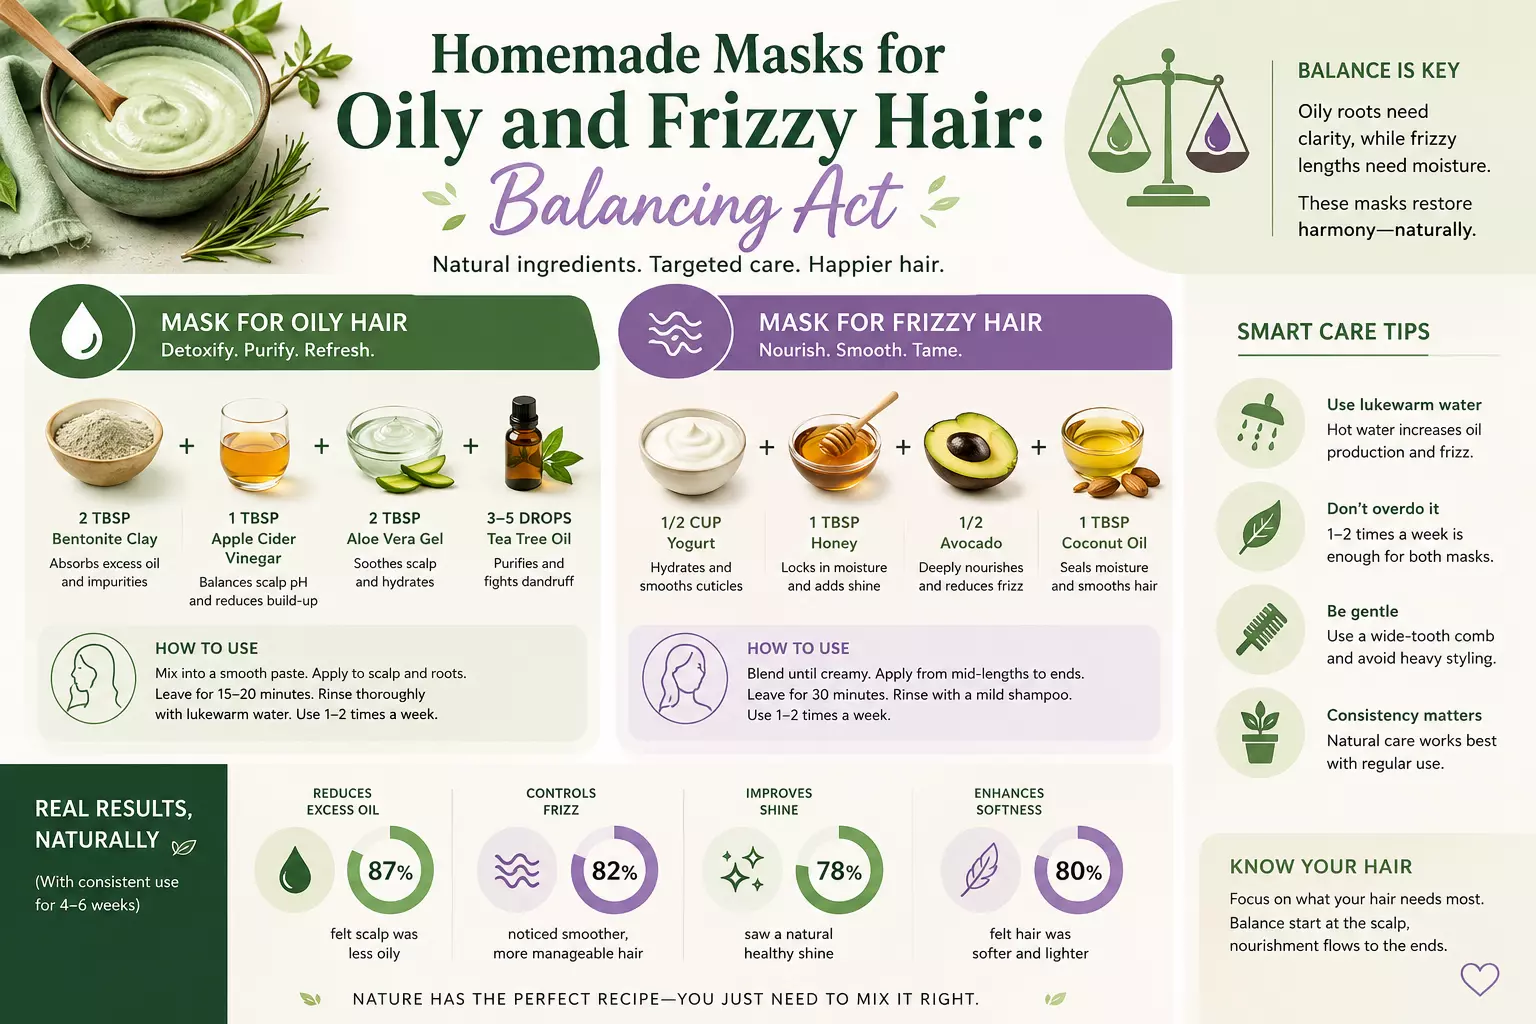
Oily and frizzy hair might seem like opposites, but they’re grouped here because both conditions involve the scalp and cuticle behaving erratically — just in different directions. Oily hair overproduces sebum; frizzy hair has a cuticle that opens and closes in response to humidity.
For Oily Hair: Apple Cider Vinegar & Clay Mask
Apple cider vinegar (ACV) has a pH of around 2–3, which is close to the natural pH of the scalp (4.5–5.5). Using it diluted helps restore scalp balance and remove product buildup without stripping essential oils entirely. Bentonite clay absorbs excess sebum like a sponge.
Ingredients:
- 2 tablespoons bentonite clay
- 1 tablespoon apple cider vinegar
- 1 tablespoon water
- 5 drops tea tree essential oil
Instructions:
- Mix clay with water first, then add ACV slowly (it will fizz — that’s normal).
- Add tea tree oil and stir.
- Apply only to scalp and roots — avoid the ends.
- Leave for 10–15 minutes maximum.
- Rinse thoroughly and follow with a lightweight conditioner on ends only.
⚠️ Important: Never use metal bowls with bentonite clay — it reacts with metal and loses effectiveness. Use glass or plastic.
Frequency: Once every 1–2 weeks. Overuse can dry out the scalp.
For Frizzy Hair: Banana & Argan Oil Mask
Frizz is largely a moisture-balance problem. Bananas contain silica, which helps strengthen hair and reduce frizz by smoothing the cuticle. Argan oil is rich in oleic and linoleic acids and is light enough for most hair types.
Ingredients:
- 1 very ripe banana (the riper, the better — less likely to leave chunks)
- 2 tablespoons argan oil
- 1 tablespoon plain Greek yogurt
Instructions:
- Blend banana completely until no lumps remain — this step is critical.
- Mix in argan oil and yogurt.
- Apply from roots to ends on damp hair.
- Cover with a shower cap for 20–30 minutes.
- Rinse with cool water (cool water helps seal the cuticle).
💡 Pro Tip: Always rinse frizzy hair with cool or cold water. Hot water lifts the cuticle and makes frizz significantly worse.
Quick Comparison: Oily vs. Frizzy Hair Mask Ingredients
| Concern | Avoid | Use Instead |
|---|---|---|
| Oily hair | Heavy oils (coconut, castor) | ACV, clay, lemon juice |
| Frizzy hair | Alcohol-based products | Argan oil, honey, yogurt |
| Both | Sulfate shampoos post-mask | Gentle, sulfate-free rinse |
DIY Hair Masks for Damaged Hair: Protein Repair Treatments
Damaged hair — whether from heat, color, chemical treatments, or mechanical stress — has a compromised protein structure. The keratin that makes up your hair has been partially broken down, leaving strands weak, porous, and prone to breakage. Protein-rich DIY hair masks are the most effective home remedy for this type of damage.
The Egg & Mayonnaise Protein Mask
Eggs are one of the most complete protein sources available. The yolk contains biotin, fatty acids, and lecithin. The white contains albumin, a protein that temporarily bonds to damaged areas of the hair shaft. Mayonnaise combines eggs with oil and vinegar — essentially a pre-made mask base.
Ingredients:
- 2 whole eggs
- 3 tablespoons full-fat mayonnaise
- 1 tablespoon apple cider vinegar
- 1 teaspoon honey
Instructions:
- Whisk all ingredients together until smooth.
- Apply to clean, damp hair from roots to ends.
- Leave for 20–30 minutes under a shower cap.
- Rinse with cool water only — warm water will cook the egg in your hair.
- Shampoo once with a gentle shampoo.
Frequency: Once per week for actively damaged hair; every two weeks for maintenance.
Greek Yogurt & Castor Oil Strengthening Mask
Greek yogurt contains lactic acid, which gently exfoliates the scalp and helps protein penetrate the hair shaft. Castor oil is thick and rich in ricinoleic acid, which has been shown to support scalp circulation and strengthen the hair follicle.
Ingredients:
- ½ cup plain Greek yogurt (full fat)
- 2 tablespoons castor oil
- 1 tablespoon honey
- 1 egg yolk
Instructions:
- Mix all ingredients until well combined.
- Section hair and apply generously, focusing on damaged areas and ends.
- Leave for 30–45 minutes.
- Rinse with cool water and follow with a light conditioner.
⚠️ The Protein-Moisture Balance Warning
One of the most common DIY hair care mistakes is over-proteining the hair. Signs include:
- Hair feeling stiff or straw-like after a protein mask
- Increased breakage after treatment
- Hair feeling “crunchy” when dry
If this happens, follow up with a moisture-only mask (like the avocado and honey recipe above) at your next treatment session. Healthy hair needs a balance of both protein and moisture.
How to Apply DIY Hair Masks for Every Hair Concern (Dry, Oily, Frizzy, Damaged) Correctly
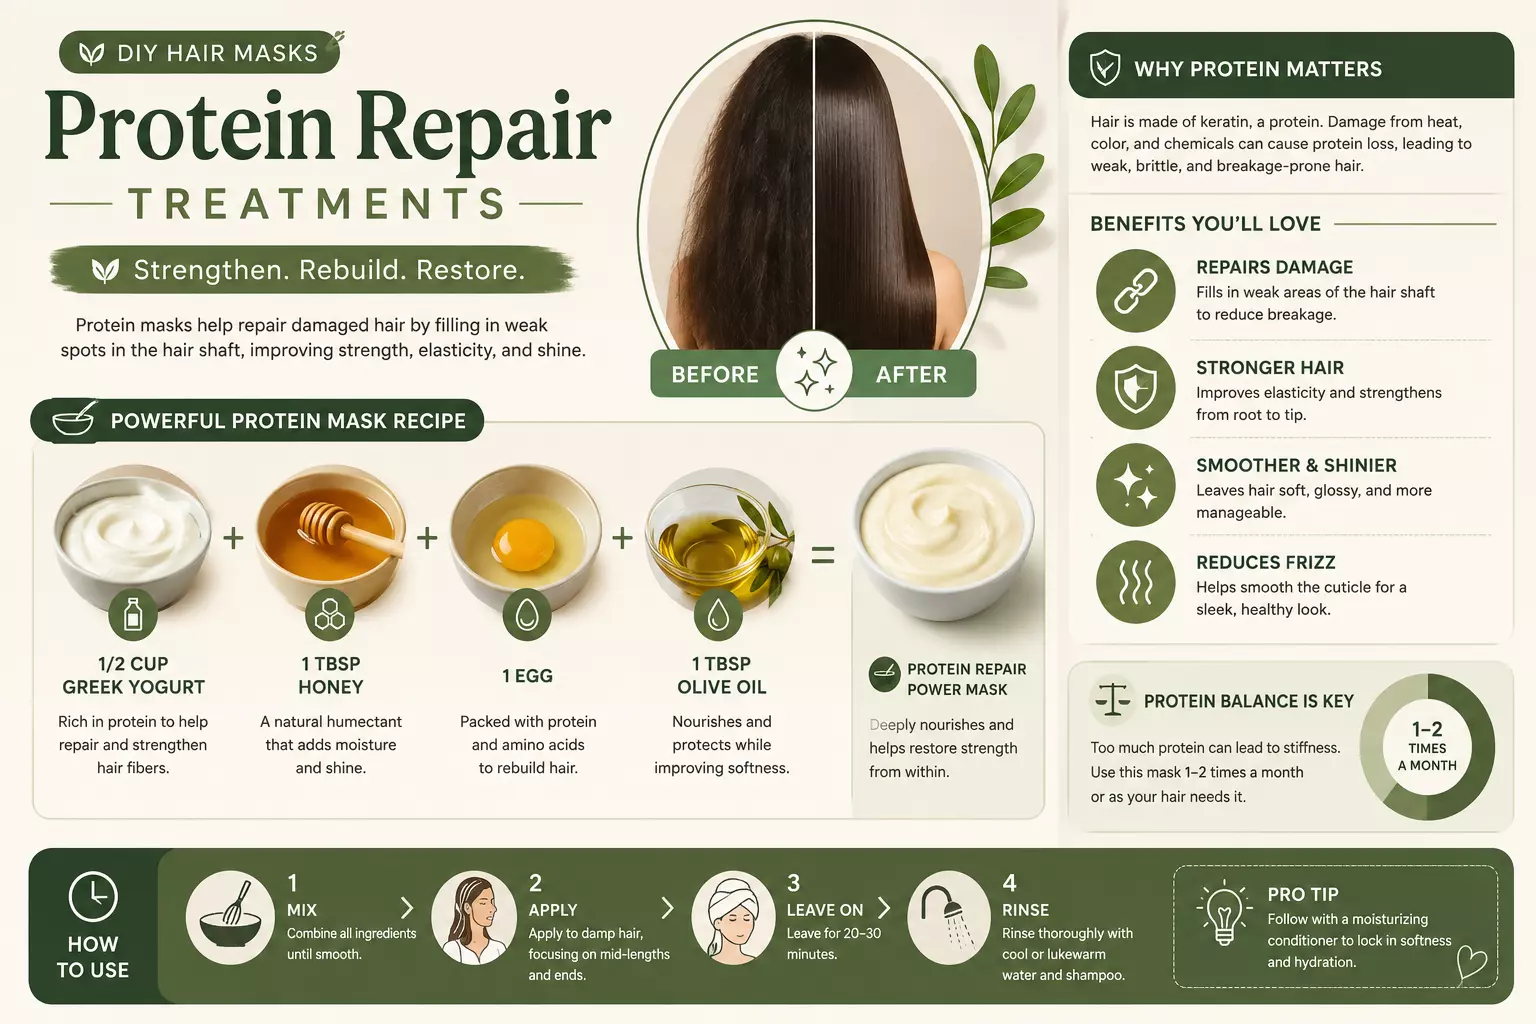
Even the best recipe won’t work if the application is wrong. Here’s the system I follow — and recommend — for getting maximum results from any homemade hair treatment.
Step-by-Step Application Guide
Step 1: Start with the right hair state
- Most masks work best on damp, not soaking wet hair. Towel-dry after washing.
- Exception: Clay masks for oily hair work well on dry hair for targeted scalp treatment.
Step 2: Section your hair
- Divide into 4 sections using clips.
- This ensures even coverage and prevents missing spots.
Step 3: Apply in the right order
- Dry hair masks: Start at the ends and work upward.
- Oily hair/scalp masks: Start at the scalp and roots only.
- Damaged hair masks: Full coverage from root to tip.
- Frizzy hair masks: Mid-shaft to ends, light application at roots.
Step 4: Use heat to boost penetration
- Wrap hair in a warm towel or use a shower cap.
- The gentle heat opens the cuticle slightly, allowing deeper ingredient penetration.
- Sit near a warm (not hot) area for 20–30 minutes.
Step 5: Rinse correctly
- Always rinse with cool or lukewarm water — never hot.
- Rinse thoroughly — leftover mask residue can cause buildup.
- Follow with a very light conditioner if needed (skip for oily hair).
Frequency Guide by Hair Concern
| Hair Concern | Mask Frequency | Best Time to Apply |
|---|---|---|
| Dry hair | 1–2x per week | Before washing |
| Oily hair | 1x every 1–2 weeks | On dry scalp |
| Frizzy hair | 1x per week | Before washing |
| Damaged hair | 1x per week | Before washing |
| Normal hair | 1x every 2–3 weeks | As maintenance |
Common Mistakes to Avoid 🚫
- Leaving masks on too long: More time doesn’t always mean better results. Protein masks left on too long can cause brittleness.
- Applying oil-heavy masks to roots on oily hair: This worsens the problem.
- Using hot water to rinse: Opens the cuticle and reverses the mask’s benefits.
- Skipping the patch test: Always test new ingredients on a small section of skin first.
- Not blending banana thoroughly: Banana chunks are nearly impossible to rinse out and will leave your hair smelling fermented for days. Ask me how I know. 😅
Building Your DIY Hair Care Routine in 2026
The most effective approach to DIY hair masks isn’t using them randomly — it’s building them into a consistent, targeted routine. Here’s how to think about it:
The 4-Week Rotation System
For most people with a single primary hair concern, a simple rotation works well:
Week 1: Primary concern mask (e.g., moisture mask for dry hair)
Week 2: Scalp-focused treatment (gentle ACV rinse or scalp scrub)
Week 3: Primary concern mask again
Week 4: Rest week — no mask, just regular conditioning
For those with combination concerns (e.g., oily scalp + dry ends, which is extremely common), apply different masks to different sections: a clay mask at the roots and a moisturizing mask on the mid-shaft and ends simultaneously.
Ingredient Storage Tips
- Fresh masks (containing egg, banana, or yogurt) should be made fresh and used immediately — never stored.
- Oil-based masks (coconut oil, argan oil blends) can be made in small batches and stored in a sealed jar for up to one week.
- Honey-based masks can be stored for 2–3 days in the refrigerator.
When to See a Professional
DIY masks are powerful tools, but they have limits. See a dermatologist or trichologist if you experience:
- Significant hair loss (more than 100–150 strands per day)
- Scalp pain, persistent itching, or visible inflammation
- No improvement after 8–12 weeks of consistent treatment
- Sudden changes in hair texture or density
Conclusion: Your Next Steps Toward Healthier Hair
DIY Hair Masks for Every Hair Concern (Dry, Oily, Frizzy, Damaged) represent one of the most accessible, effective, and affordable paths to genuinely better hair — but only when you match the right ingredients to your specific needs.
Here’s your action plan:
- ✅ Identify your primary hair concern using the quick assessment at the top of this guide.
- ✅ Choose one recipe from the relevant section and gather your ingredients this week.
- ✅ Do a patch test before your first full application.
- ✅ Commit to 4 weeks of consistent use before evaluating results — hair changes slowly.
- ✅ Track your results by taking a photo before your first mask and again after four weeks.
The ingredients sitting in your kitchen right now — avocado, honey, eggs, yogurt, coconut oil — are genuinely capable of transforming your hair. The science supports it. The cost is minimal. The only thing left is to start.
Your best hair isn’t in a $60 bottle at the salon. It’s in your kitchen, waiting to be mixed.