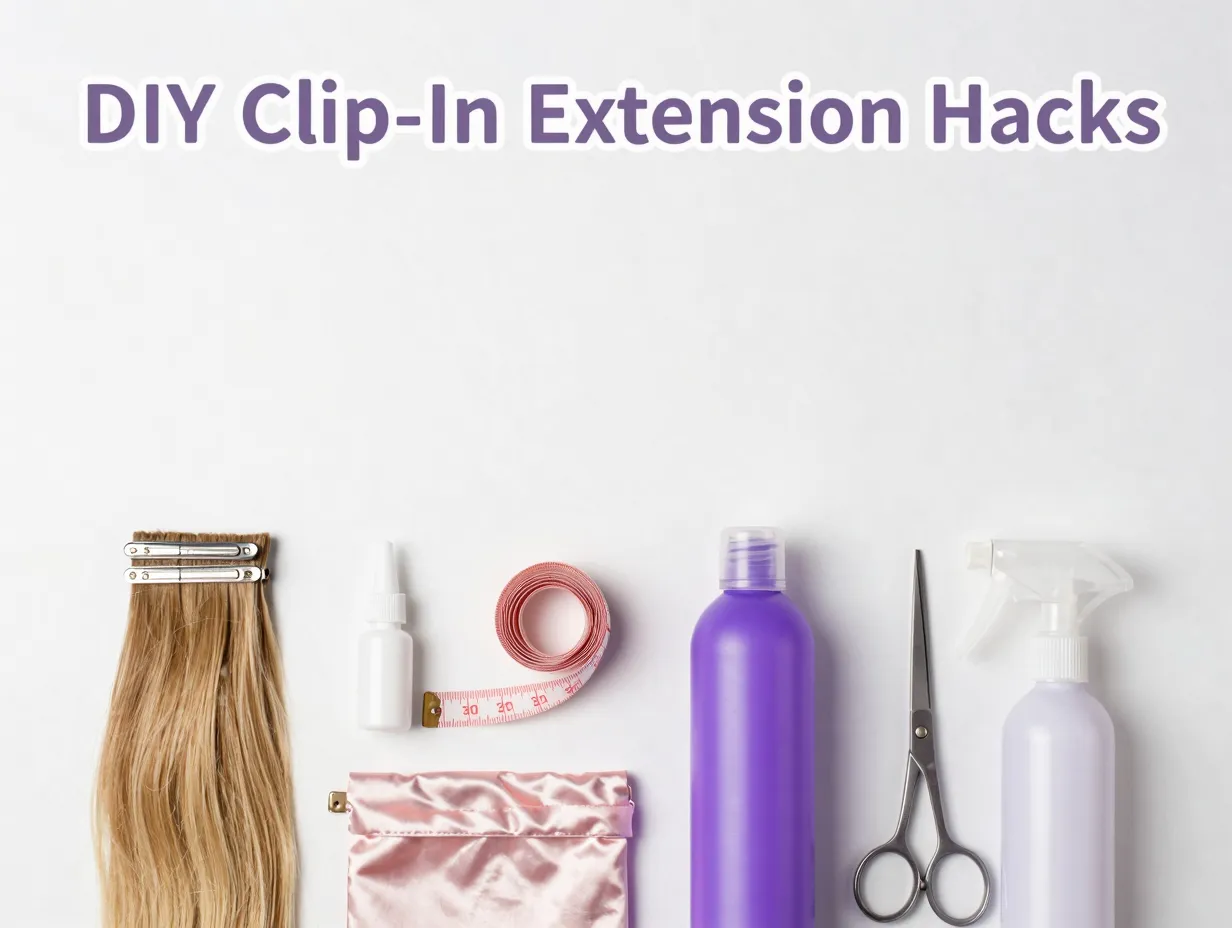
8 DIY Clip-In Hair Extensions Hacks for Length & Volume on a Budget
The average American woman spends $300 to $600 per year on hair extensions — and that’s before factoring in salon installation fees. Yet a growing community of savvy beauty enthusiasts is building full, salon-worthy sets of clip-in extensions for under $40 using techniques that rival luxury brands. These aren’t shortcuts that compromise quality; they’re smart, strategic approaches that the professional extension industry would rather you didn’t know about.
This guide covers the 8 DIY Clip-In Hair Extensions Hacks for Length & Volume on a Budget that are actually worth your time in 2026. Whether you’re repurposing old bundles, maximizing coverage with strategic placement, or learning how to blend like a pro, these hacks will transform both your hair and your bank account. Every tip here is practical, tested, and designed for real people working with real budgets.
Key Takeaways 📌
- You can build a full set of clip-in extensions for under $40 by repurposing old wefts or bundles with the right adhesive and clips.
- Doubling or tripling your wefts before attaching clips creates salon-level volume without buying extra hair.
- Strategic head mapping means fewer pieces provide maximum coverage — saving money and reducing damage.
- Proper blending and toning at home eliminates the need for expensive color-matching services.
- Correct storage and maintenance can extend the life of your DIY clip-ins by 12–18 months or more.
Why DIY Clip-In Extensions Are the Smartest Beauty Hack of 2026
Before diving into the hacks, it helps to understand why clip-ins are the best entry point for DIY extensions. Unlike tape-ins, sew-ins, or fusion bonds, clip-ins require no heat, no glue applied to your scalp, and no professional installation [2]. They’re fully removable, reusable, and — when made correctly — completely undetectable.
The market for clip-in extensions has exploded, with options ranging from $15 synthetic packs to $400 seamless human-hair sets. The truth is, the difference between a $40 DIY set and a $300 luxury set often comes down to how the wefts are prepared and attached, not the underlying hair quality [3]. That’s exactly the gap these hacks exploit.
The 8 DIY Clip-In Hair Extensions Hacks for Length & Volume on a Budget
1. Repurpose Old Bundles or Wefts Into Custom Clip-Ins
The single most impactful budget hack is also the most overlooked: you almost certainly already own the raw material.
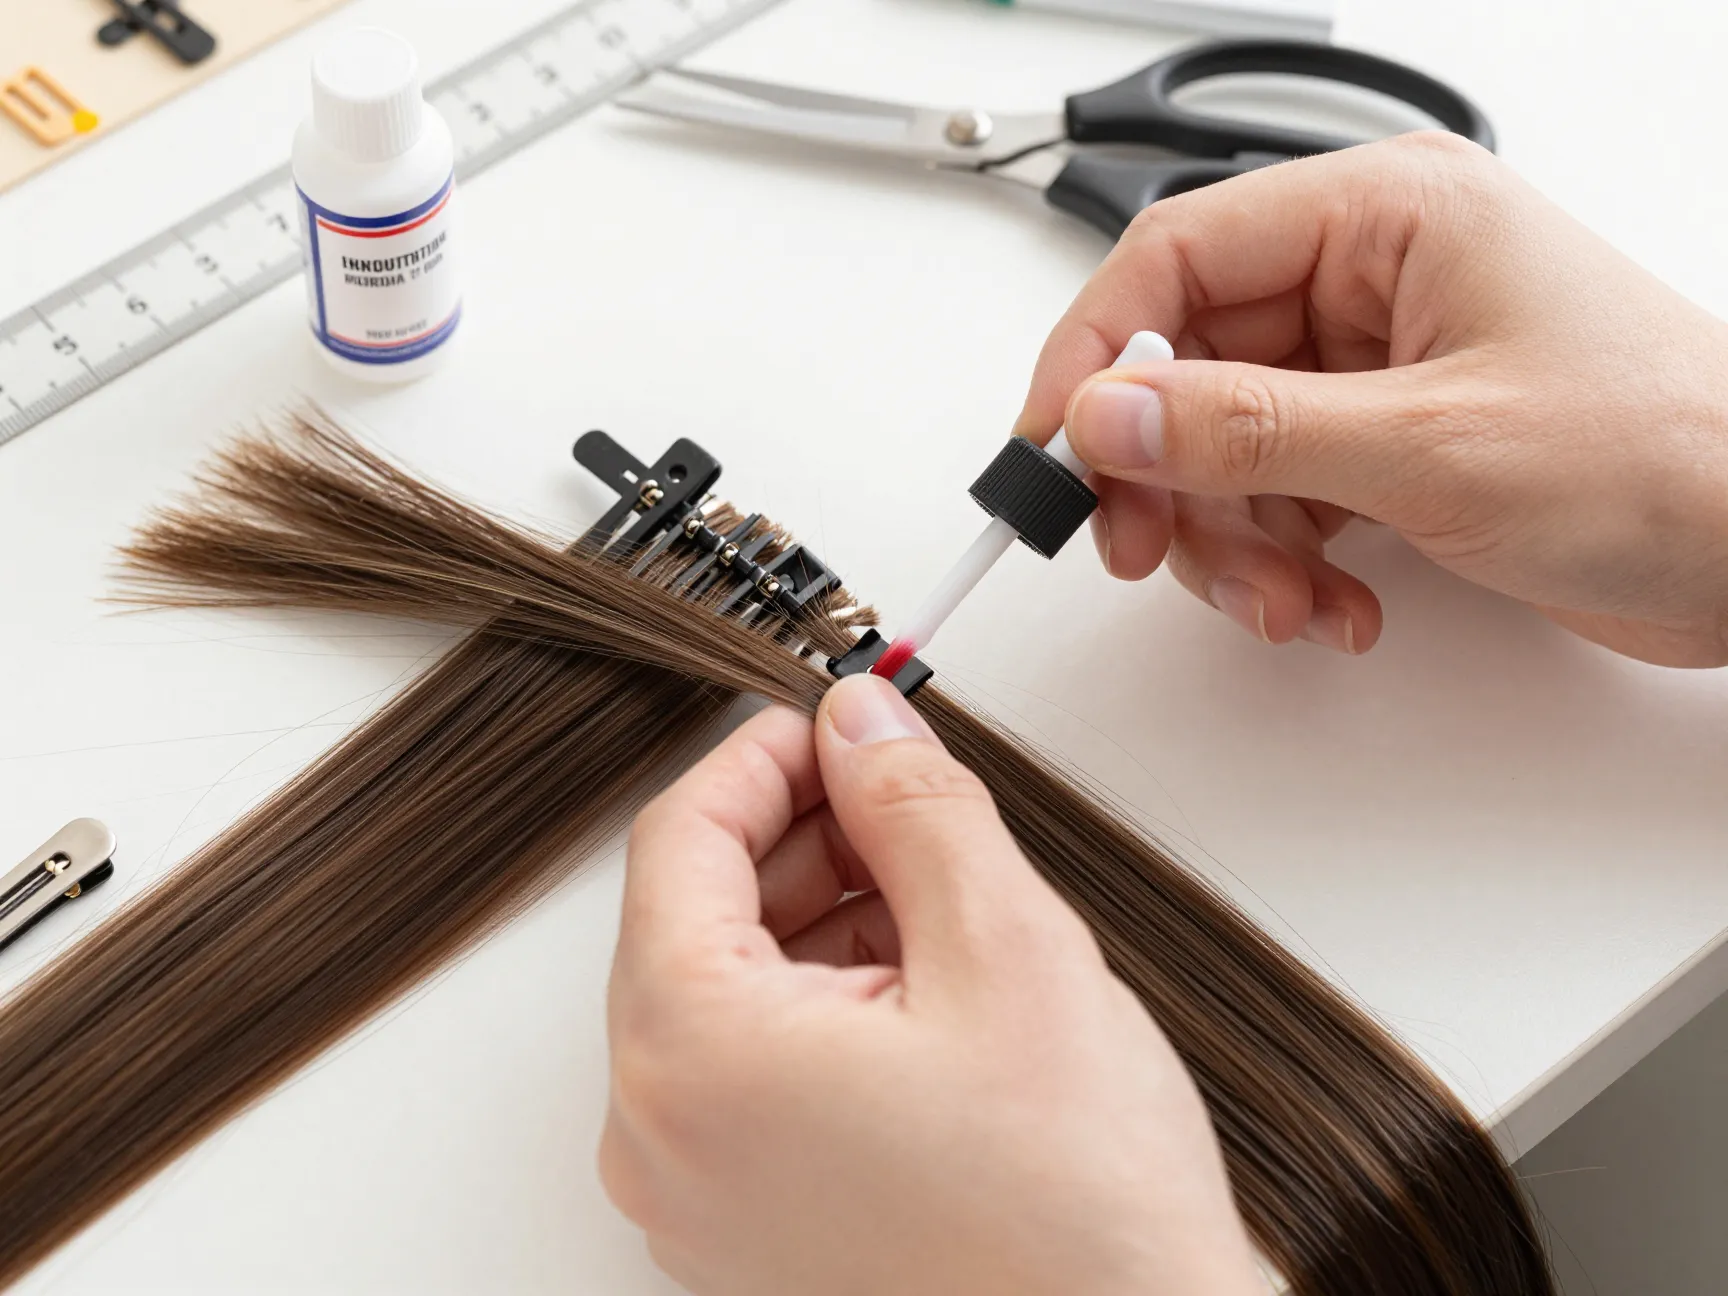
Old human-hair bundles, leftover wefts from a previous sew-in, or inexpensive wefts purchased online can all be transformed into a complete clip-in set. The key is the attachment method. Tutorials from creators like Mo at Go Sleek demonstrate that nail glue — not “crazy glue” or super glue — is the ideal adhesive for bonding wig clips to wefts [1]. Nail glue creates a firm bond that remains slightly flexible, so the clips don’t snap off or crack the weft backing over time.
What you’ll need:
- Old human-hair bundles or new wefts (budget: $15–$25)
- Snap wig/extension clips (a pack of 50 costs roughly $5–$8)
- Nail glue or fabric glue
- Sharp fabric scissors
- A ruler or measuring tape
The process in brief:
- Cut your wefts into sections sized for different parts of your head (more on sizing in Hack 3).
- Apply a thin line of nail glue along the top edge of the weft.
- Press the open clip firmly onto the glued section and hold for 30–60 seconds.
- Allow to cure for at least 2 hours before use.
Creators following this method report building a full head set for under $40, compared to luxury seamless clip-in sets that retail for $250–$300+ [1][3]. If you start with good-quality human hair, the finished product is genuinely difficult to distinguish from premium retail sets.
2. Double or Triple Your Wefts for Maximum Volume
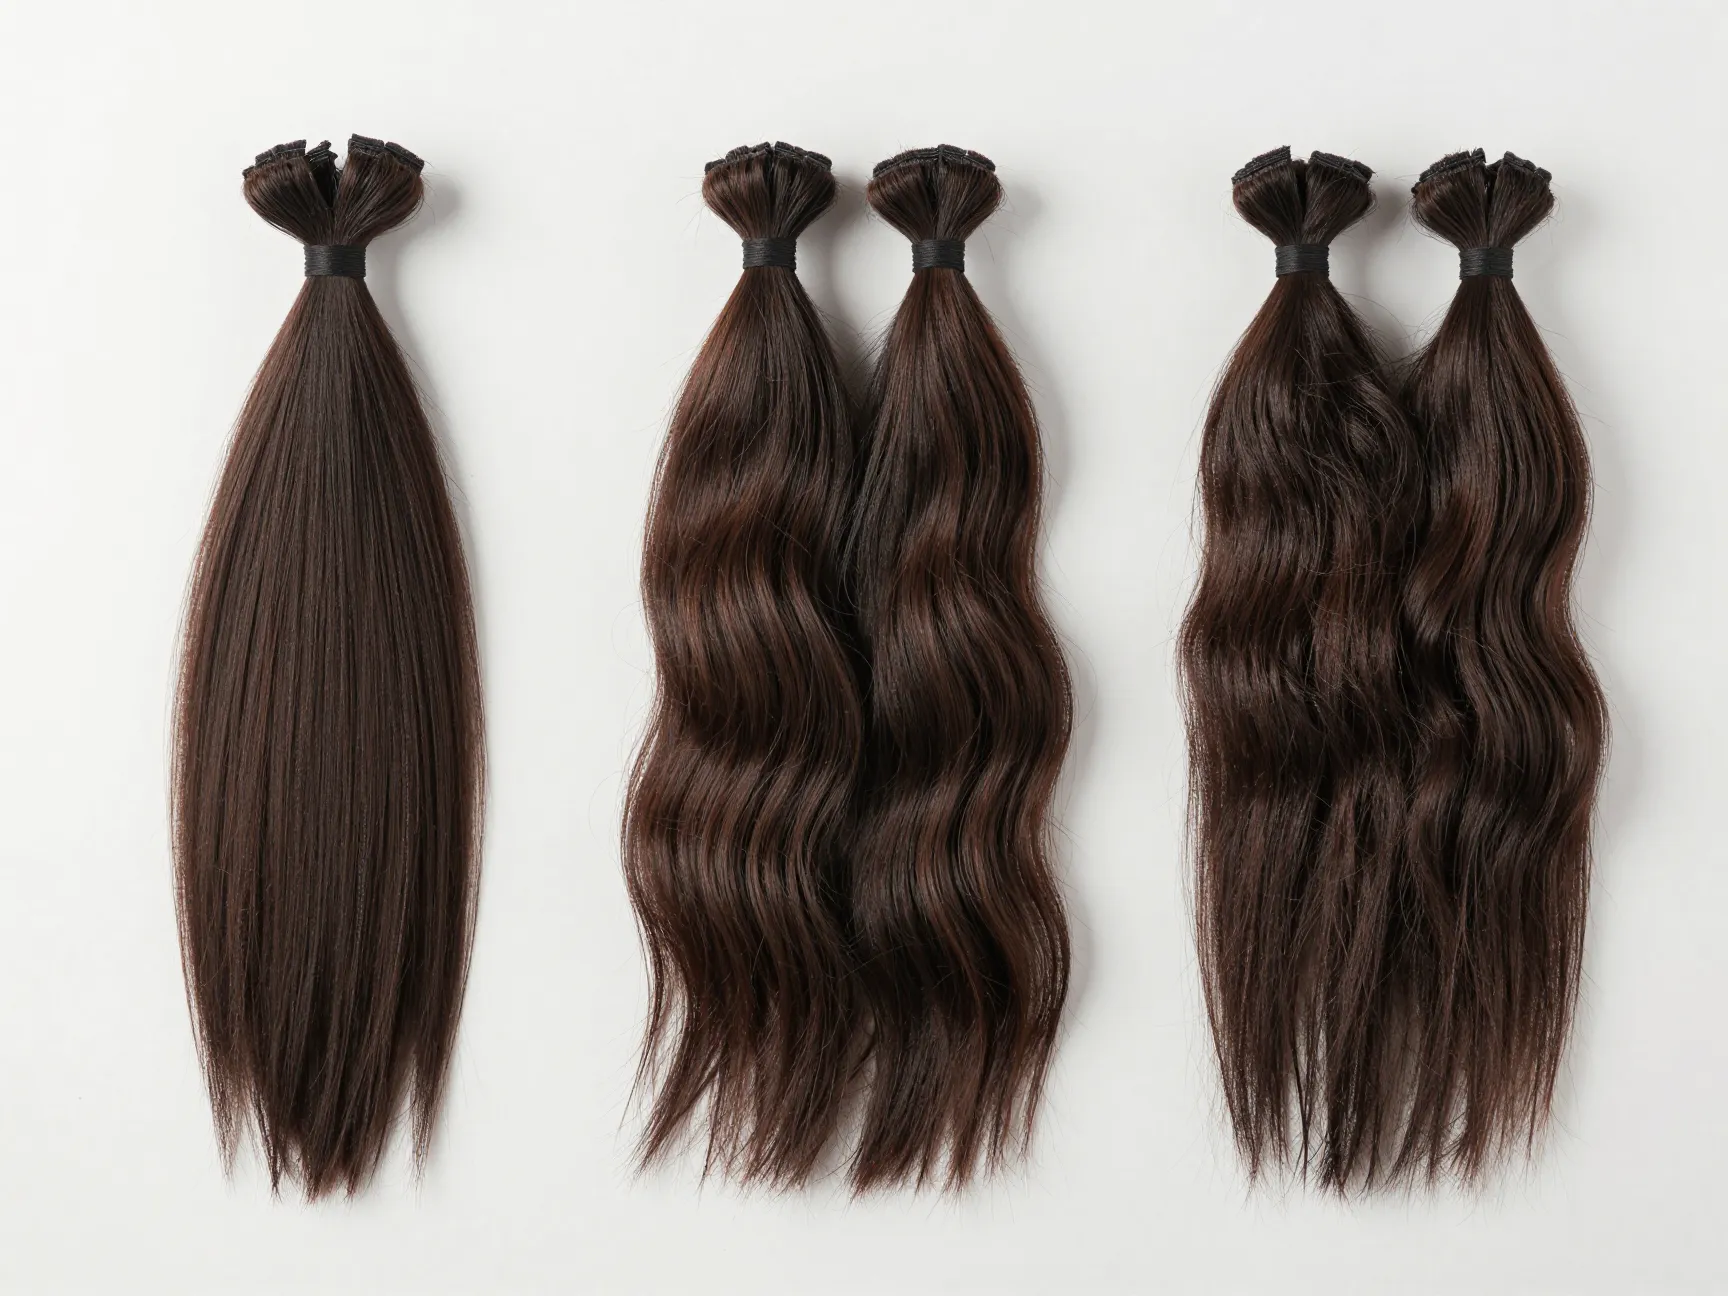
One of the most common complaints about budget clip-in extensions is that they look thin or flat. The fix is simple and costs nothing extra: layer your wefts before attaching the clips.
Instead of attaching a single layer of hair to each clip track, fold the weft back on itself once (doubling) or twice (tripling) before gluing the clips in place. This creates a track that is two to three times as dense as a single-layer piece [4].
💡 Pro Tip: Double your wefts when your primary goal is added length. Triple them when you’re chasing big, bouncy volume.
Here’s a quick reference guide:
| Goal | Weft Layers | Clips Per Piece | Result |
|---|---|---|---|
| Natural length | 1 layer | 2–3 clips | Subtle, everyday look |
| Blended volume | 2 layers | 3–4 clips | Salon-level fullness |
| Statement volume | 3 layers | 4–5 clips | High-impact, editorial |
The Instructables DIY clip-in guide recommends using 15–20 clips total for a full head set to prevent slipping or pieces falling out throughout the day [4]. Mo’s tutorial echoes this, noting that doubling the wefts is what elevates a budget DIY set to something that genuinely competes with salon results [1].
Don’t skimp on the number of clips per piece. A wide weft with only one clip in the center will bow, slip, and eventually pull at your natural hair. More clips = more security = longer wear.
3. Map Your Head Before You Cut a Single Weft
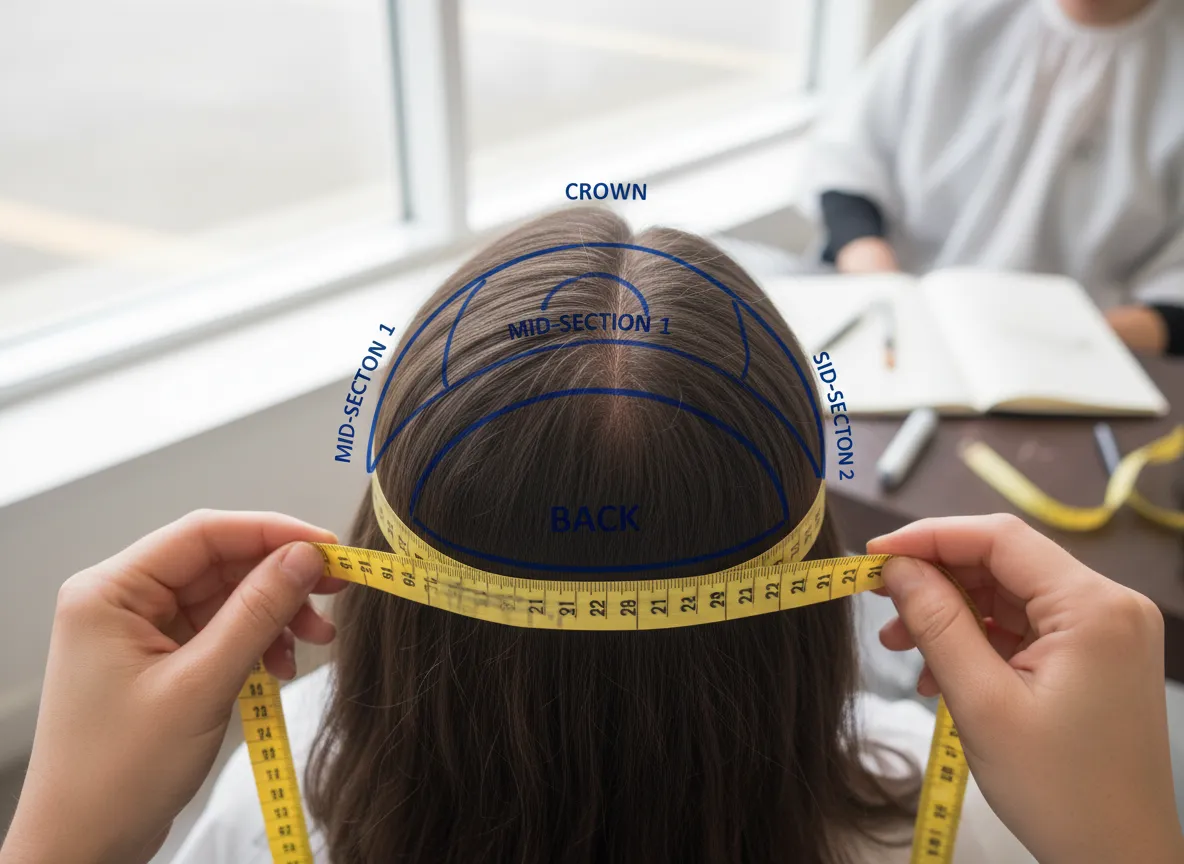
Most beginners make the same expensive mistake: they cut all their wefts to the same length and end up with gaps, uneven coverage, or way more pieces than they actually need. Head mapping solves this entirely.
Before you cut anything, section your hair and measure the width of each section from ear to ear across your head. A standard head typically needs:
- 1 wide piece (6–8 inches) for the back/nape
- 2 medium pieces (4–5 inches) for the mid-section
- 2 narrow pieces (2–3 inches) for the sides
- 1–2 small pieces (1–2 inches) for the crown area
By cutting your wefts to match these exact measurements, you use less hair overall while achieving better coverage than a set of randomly sized pieces [4]. This is how professional extension stylists think — and it’s why a well-mapped DIY set can outperform an expensive off-the-shelf kit that wasn’t designed for your specific head shape.
Use a fabric measuring tape and a washable marker to mark your weft before cutting. Always cut slightly longer than your measurement — you can trim, but you can’t add back.
4. Use a Toning Shampoo to Color-Match on a Budget
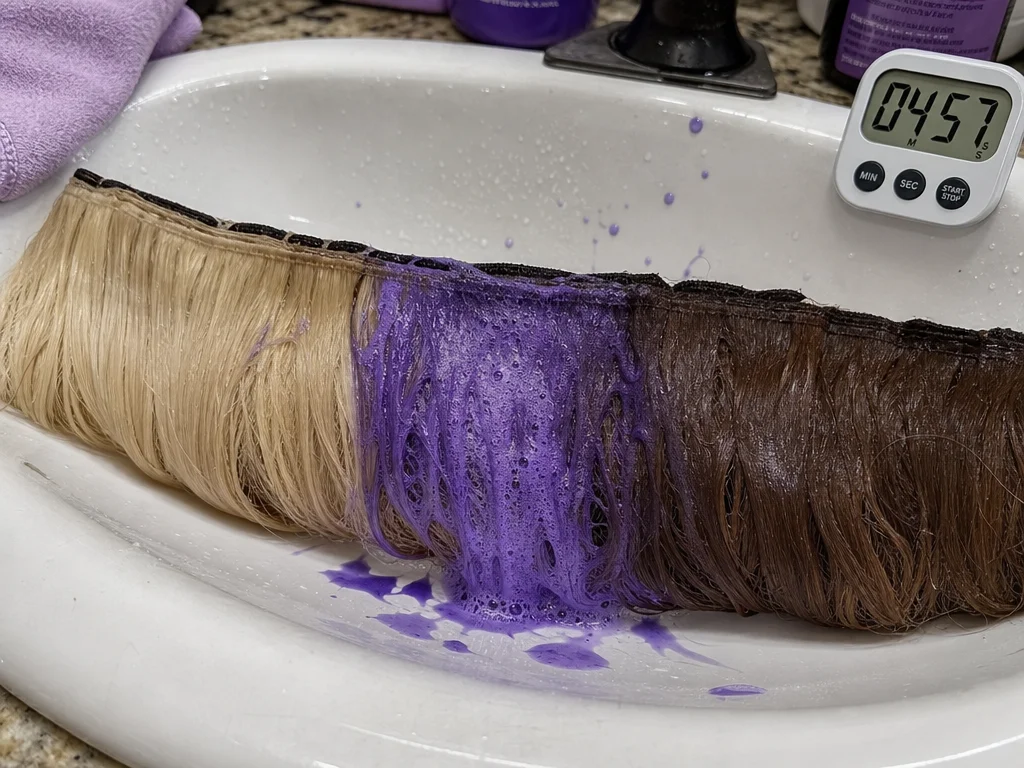
Buying extensions that perfectly match your hair color is one of the biggest cost drivers in the extension market. Salons charge for color-matching consultations, and pre-colored extension sets carry a significant price premium. Toning shampoo is your cheat code.
If your wefts are slightly too warm (brassy or orange-toned), a purple or blue toning shampoo applied for 5–15 minutes can shift the tone significantly [5]. If they’re too cool or ashy, a warm-toned conditioner or a brief rinse with a color-depositing product in a golden or honey shade can warm them up.
Toning process:
- Wet the weft thoroughly.
- Apply toning shampoo generously.
- Leave on for 5–15 minutes (check every 5 minutes to avoid over-toning).
- Rinse thoroughly and condition.
- Allow to air dry before testing against your natural hair in natural light.
This technique works best on light blonde to medium brown extensions. For darker shades, the tonal difference is less visible and less impactful. The goal isn’t a full color change — it’s a subtle shift of 1–2 tones to achieve a seamless blend [5].
🎨 Color-Matching Rule of Thumb: Always match your extensions to your mid-lengths and ends, not your roots. Your natural hair is almost always darker at the root, so matching to the ends creates the most natural overall blend.
5. Backcomb the Root Base for an Invisible Grip
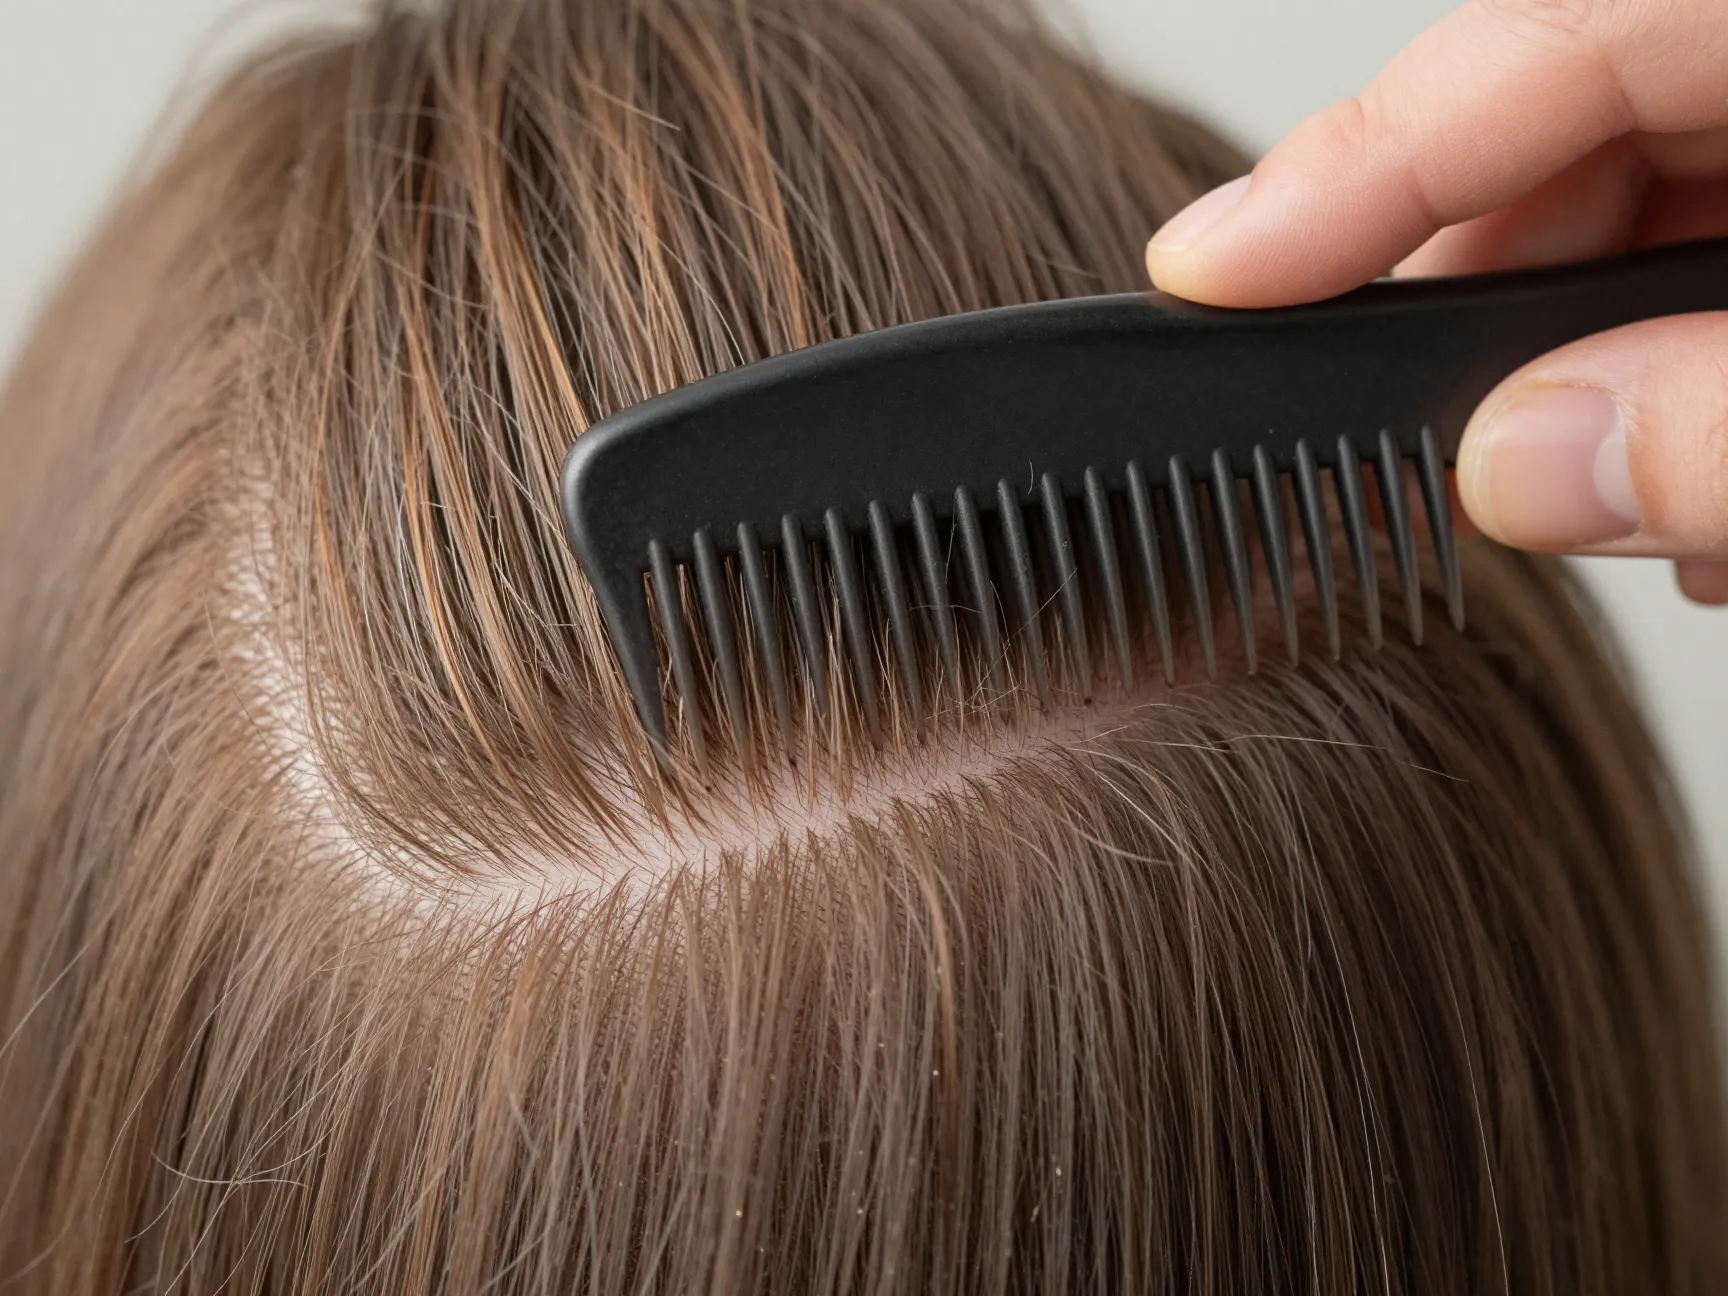
Even the most beautifully made clip-ins will slip if they’re clipped onto smooth, freshly washed hair. The secret to all-day hold without damaging your natural hair is strategic backcombing at the root.
Before clipping in each piece, take a fine-tooth comb and gently backcomb a small section at the root — just 2–3 strokes is enough. This creates a micro-textured base that gives the clip teeth something to grip [5][6]. You’re not creating a teased beehive; you’re creating just enough texture to anchor the clip securely.
Additional grip tips:
- Apply a light-hold dry shampoo to roots before installing extensions — it adds texture and absorbs oil that causes slipping.
- Install extensions on day-two or day-three hair rather than freshly washed hair, which is naturally too slippery.
- For fine or silky hair types, a small amount of texturizing spray at the root base before clipping in can make a significant difference in hold [6].
This hack alone can extend your wear time from 4–6 hours to a full 10–12 hour day without readjusting.
6. Cut and Layer Your Extensions to Match Your Natural Hair
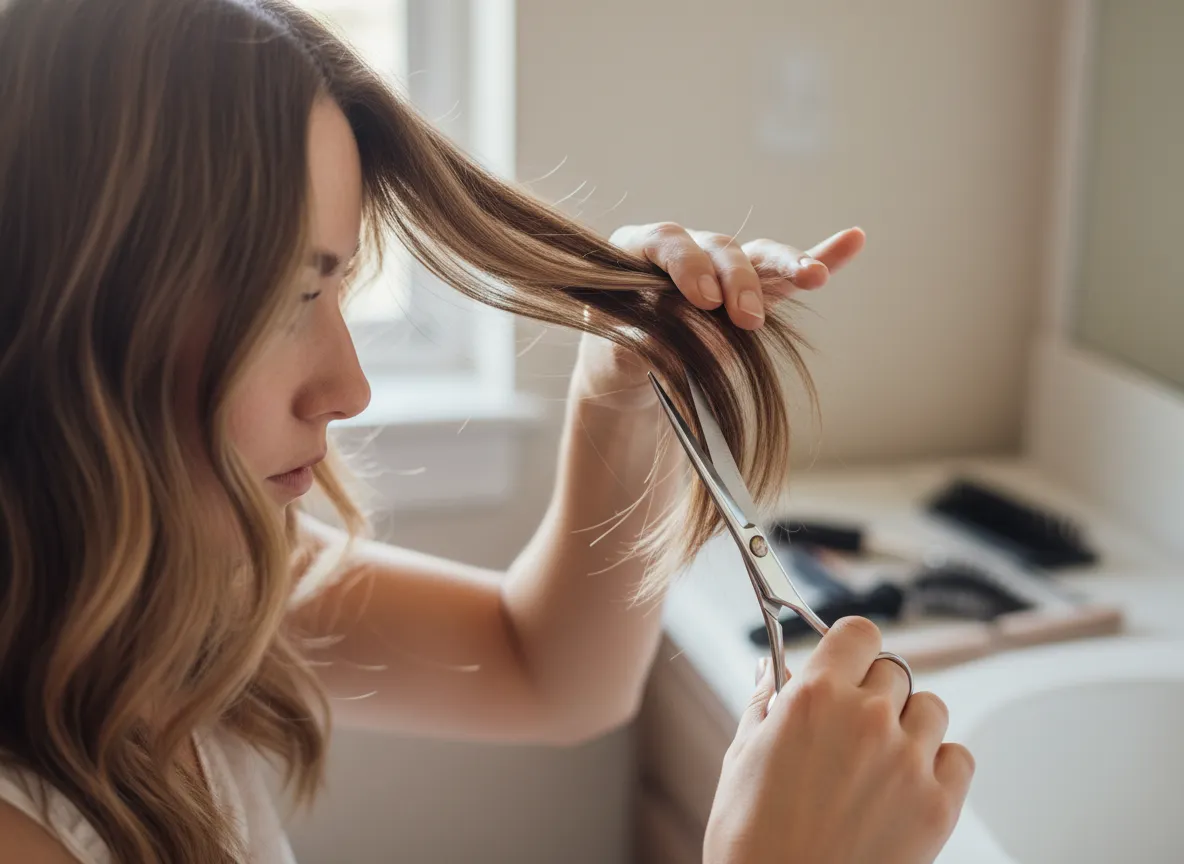
Straight-across extension wefts look unnatural on almost everyone because real hair has layers, movement, and texture. The good news: a basic trim and layer job on your DIY extensions takes about 15 minutes and costs nothing if you already own hair scissors.
Simple layering method:
- Clip all your extensions in place and let them hang naturally.
- Hold a section of your natural hair alongside the extension and note where the extension length falls.
- Using sharp hair scissors (not craft scissors — they crush the hair shaft), trim the extension ends to match the natural angle of your hair.
- For face-framing pieces, cut a slight angle so the front pieces are 1–2 inches shorter than the back pieces.
This is one of the most impactful hacks in the entire list. A $20 set of extensions that’s been properly layered and blended will look more natural than a $200 set that hasn’t been customized [7]. The layering removes the “block” look that immediately signals fake hair.
✂️ Important: Always cut extensions while they’re clipped into your hair, not while holding them in your hand. The way hair hangs on your head is different from how it hangs freely, and cutting while installed ensures the layers fall correctly.
7. Apply Heat Protectant and Use Low Heat to Style for Longevity
Human-hair extensions can be styled with heat tools, but they don’t have the same natural oils and regenerative properties as hair growing from your scalp. Without protection, heat styling can turn a set of beautiful extensions into dry, frizzy, unusable wefts within weeks.
The budget-conscious approach to longevity is simple: always use heat protectant, always use the lowest effective heat setting [8].
Heat guidelines for DIY clip-ins:
| Hair Type | Max Recommended Temp | Tool Setting |
|---|---|---|
| Fine human hair | 300°F (150°C) | Low |
| Medium human hair | 350°F (175°C) | Medium |
| Coarse human hair | 380°F (193°C) | Medium-high |
| Synthetic hair | No heat | N/A |
A silicone-based heat protectant spray is the most effective option for extensions because it coats the hair shaft without weighing it down [8]. Apply it to dry extensions before any heat styling.
Additionally, avoid washing your clip-in extensions more than once every 10–15 wears. Over-washing strips the hair of moisture and causes premature tangling and matting. When you do wash them, use a sulfate-free shampoo, wash in a downward motion (never circular), and always follow with a deep conditioner.
8. Store Extensions Properly to Make Them Last 12–18 Months
The final hack is the one most people skip — and it’s the reason many DIY extension sets end up tangled, matted, and unusable within a few months. Proper storage is the single biggest factor in extension longevity [9][10].
The right way to store clip-in extensions:
- Detangle thoroughly before storing — start from the ends and work upward.
- Braid or loosely roll each weft to prevent tangling.
- Store in a satin or silk bag (not plastic, which traps moisture and causes mildew).
- Keep in a cool, dry location away from direct sunlight, which fades color over time.
- Never store extensions while damp — always ensure they’re fully dry first.
A simple hanging extension organizer (available for $10–$15 online) is one of the best investments you can make for your DIY set. Hanging the wefts vertically prevents kinks and keeps the hair flowing in one direction, which dramatically reduces tangling [9].
With proper storage and maintenance, a well-made DIY set of human-hair clip-ins can last 12–18 months or longer — meaning your $40 investment pays dividends across dozens or even hundreds of wears [2].
Putting It All Together: A Budget Breakdown
Here’s what a complete DIY clip-in extension set looks like when you apply these hacks from start to finish:
| Item | Estimated Cost |
|---|---|
| Human hair wefts (2–3 bundles) | $15–$25 |
| Snap wig clips (pack of 50) | $5–$8 |
| Nail glue | $3–$5 |
| Toning shampoo (if needed) | $8–$12 |
| Satin storage bag | $5–$8 |
| Total | $36–$58 |
Compare that to a luxury seamless clip-in set at $250–$300+, and the math speaks for itself. Even at the high end of this budget, you’re spending less than 20% of the retail price for a result that — with the blending, layering, and toning hacks applied — is genuinely comparable in appearance and wearability [1][3].
Common Mistakes to Avoid
Even with the best hacks, a few common errors can undermine your results:
- ❌ Using super glue instead of nail glue — super glue is too rigid and will crack the weft backing
- ❌ Cutting wefts without measuring first — always map your head before cutting
- ❌ Installing on freshly washed hair — smooth hair = no grip = slipping extensions
- ❌ Skipping heat protectant — this is the fastest way to ruin human-hair extensions
- ❌ Storing damp extensions — moisture causes mildew, matting, and odor
- ❌ Washing too frequently — once every 10–15 wears is sufficient for clip-ins
Conclusion: Start Small, Build Smart
The 8 DIY Clip-In Hair Extensions Hacks for Length & Volume on a Budget covered in this guide aren’t just money-saving tricks — they’re a complete system for building, wearing, and maintaining extensions that look professional and last long. The beauty industry profits from the assumption that great hair requires a great budget. These hacks prove otherwise.
Your actionable next steps:
- Audit what you already own. Check for old bundles, wefts, or extension pieces before buying anything new.
- Start with Hack 3 (head mapping) before you cut or glue anything — it determines everything else.
- Invest in nail glue and a pack of snap clips — the two items that unlock the most valuable hacks on this list.
- Apply the toning hack before your first wear to ensure seamless color blending.
- Set up proper storage from day one so your investment lasts through the full 12–18 month lifespan.
The total investment is under $60. The results, when these hacks are applied correctly, are indistinguishable from sets costing five to ten times more. Start with one hack, build your confidence, and expand your technique from there. Your hair — and your wallet — will thank you.
References
[1] Watch (DIY Budget-Friendly Clip-Ins Tutorial – Go Sleek / Mo) – https://www.youtube.com/watch?v=Ks5CDFkVkcg
[2] Clip In Hair Extensions Add Instant Volume Without Salon Visits 2026 Guide – https://www.belacio.hair/articles/clip-in-hair-extensions-add-instant-volume-without-salon-visits-2026-guide/
[3] Watch (DIY Luxury Seamless Clip-Ins Under $40 – Vanessa Herring) – https://www.youtube.com/watch?v=myNL6FX_I7A
[4] DIY Clip-In Hair Extensions – https://www.instructables.com/DIY-Clip-In-Hair-Extensions/
[5] Clip In Hair Extension Hacks – https://1hairstop.in/blogs/all-about-hair/clip-in-hair-extension-hacks
[6] Watch – https://www.youtube.com/watch?v=TS_CM8lqnAA
[7] Watch – https://www.youtube.com/watch?v=IWgYqm9T9cQ
[8] Watch – https://www.youtube.com/watch?v=FyqmZKYrmFE
[9] Watch – https://www.youtube.com/watch?v=sX_pMeTfY38
[10] Watch – https://www.youtube.com/watch?v=iweLH5dpQN8