8 Easy & Protective Rubber Band Hairstyles for Natural Hair Kids
Nearly 70% of Black girls report experiencing some form of hair-related anxiety before age 10 — often tied to painful detangling sessions and styles that don’t last through a full school week. As a parent, caregiver, or stylist, you already know the Sunday-night hair struggle is real. The good news? The 8 easy & protective rubber band hairstyles for natural hair kids covered in this guide are designed to end that cycle — protecting delicate curl patterns, reducing breakage, and making Monday mornings genuinely manageable.
Rubber band styles have surged in popularity in 2026 for good reason. They’re versatile, budget-friendly, and genuinely protective when done correctly. Whether your child has loose 3C curls or tight 4C coils, these styles work across textures and can last anywhere from three days to two full weeks with proper care.
Key Takeaways 📌
- Snag-free rubber bands are non-negotiable — standard rubber bands cause breakage and should never be used on natural hair.
- Rubber band hairstyles can be genuinely protective when hair is moisturized before styling and sealed afterward.
- Most of the 8 styles in this guide take under 45 minutes to complete, even for beginners.
- Sectioning is the secret — clean, even sections make every rubber band style look more polished and last longer.
- These styles work best on stretched or freshly washed and conditioned natural hair.
Why Rubber Band Styles Work So Well for Natural Hair Children
Before diving into the full list of 8 easy & protective rubber band hairstyles for natural hair kids, it’s worth understanding why rubber band styles have become a staple in the natural hair community — especially for children.
The Science of Protective Styling
Natural hair, particularly Type 3 and Type 4 textures, is most vulnerable at its ends. Every time a child runs, plays, or sleeps, those fragile ends rub against clothing, pillowcases, and other surfaces. Protective styles tuck or secure the ends, reducing that friction dramatically.
Rubber band styles work as protective styles because:
- They keep sections defined, reducing tangling between washes.
- They limit manipulation — once the style is set, there’s minimal daily combing needed.
- They distribute tension evenly across the scalp when applied correctly, unlike tight ponytails that concentrate stress at one point.
💬 “A style that lasts a full week means seven fewer days of aggressive detangling — and that adds up to real length retention over time.”
Choosing the Right Rubber Bands
Not all rubber bands are created equal. Here’s a quick comparison:
| Band Type | Safe for Natural Hair? | Best For |
|---|---|---|
| Standard office rubber bands | ❌ No | Paper, not hair |
| Snag-free hair elastics | ✅ Yes | All styles |
| Goody Ouchless bands | ✅ Yes | Fine to medium hair |
| Thick silicone bands | ✅ Yes | Thicker, denser hair |
| Clear mini elastics | ✅ Yes (if snag-free) | Detailed styles |
Always choose bands labeled “snag-free” or “no-metal.” Metal clasps on cheap elastics are one of the top causes of breakage in children’s natural hair.
Tools & Prep: Setting Up for Success
Great results start before the first rubber band is applied. Here’s a simple prep checklist:
- ✅ Freshly washed and conditioned hair (or stretched hair from a blowout)
- ✅ Leave-in conditioner applied section by section
- ✅ Light oil or butter to seal in moisture (coconut, castor, or shea)
- ✅ Rat-tail comb for clean parting
- ✅ Wide-tooth comb or detangling brush for gentle detangling
- ✅ Snag-free rubber bands in your chosen colors
- ✅ Spray bottle with water for refreshing sections as you work
Pro tip: Work in a well-lit area and keep your child engaged with a favorite show or audiobook. Comfort during styling builds positive associations with hair care.
The Complete Guide: 8 Easy & Protective Rubber Band Hairstyles for Natural Hair Kids
Here are the 8 easy & protective rubber band hairstyles for natural hair kids, ordered from simplest to most detailed. Each entry includes a difficulty rating, estimated time, and how long the style typically lasts.
1. Classic Rubber Band Ponytail
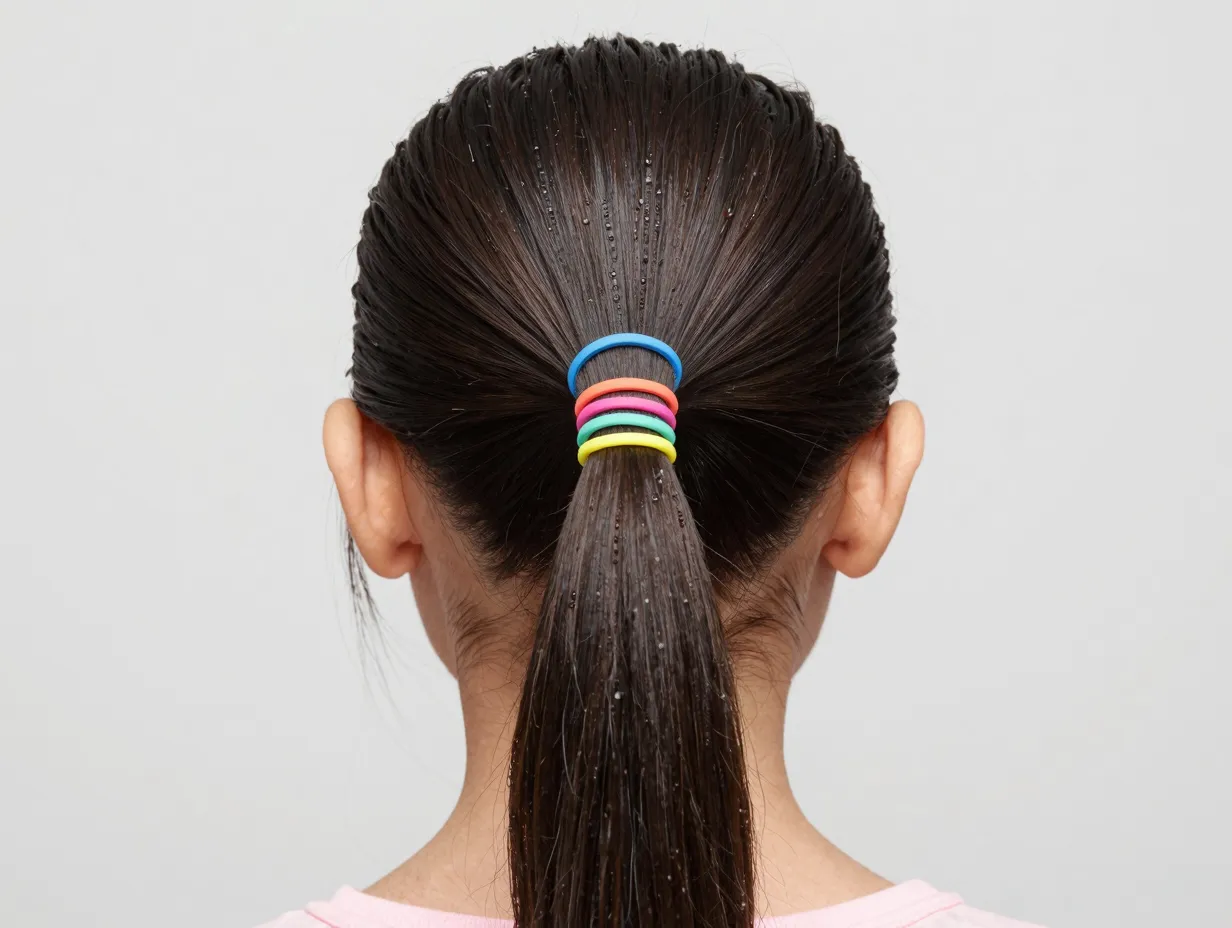
Difficulty: ⭐ Beginner | Time: 10–15 minutes | Lasts: 3–5 days
The classic rubber band ponytail is the foundation of every other style on this list. It’s simple, clean, and genuinely protective when done right.
How to do it:
Start with detangled, moisturized hair. Gather all the hair toward the crown, nape, or side — wherever your child prefers. Smooth the hair with your palms and a little edge control or gel. Secure with one snag-free band, then wrap a second band a half-inch below the first. Continue adding bands down the length of the ponytail, spacing them about an inch apart. This “banded ponytail” technique stretches the hair gently and keeps curls from shrinking back into a tangled mass.
Why it’s protective: The bands prevent the ponytail from tangling at the ends and reduce frizz throughout the week.
2. Two-Strand Twist-Out with Rubber Band Base
Difficulty: ⭐⭐ Beginner-Intermediate | Time: 20–30 minutes | Lasts: 5–7 days
This style combines the definition of a two-strand twist with the security of a rubber band base, giving you a style that looks intentional and holds up through active play.
How to do it:
Part the hair into four to six sections depending on thickness. Secure each section at the root with one snag-free rubber band. Then two-strand twist each section from the band down to the ends. Seal the ends with a small band or a dab of butter. Allow to set overnight under a satin bonnet or scarf.
Why it’s protective: The rubber band at the base keeps the root area neat and reduces the manipulation needed to maintain the twist. The twist itself protects the ends.
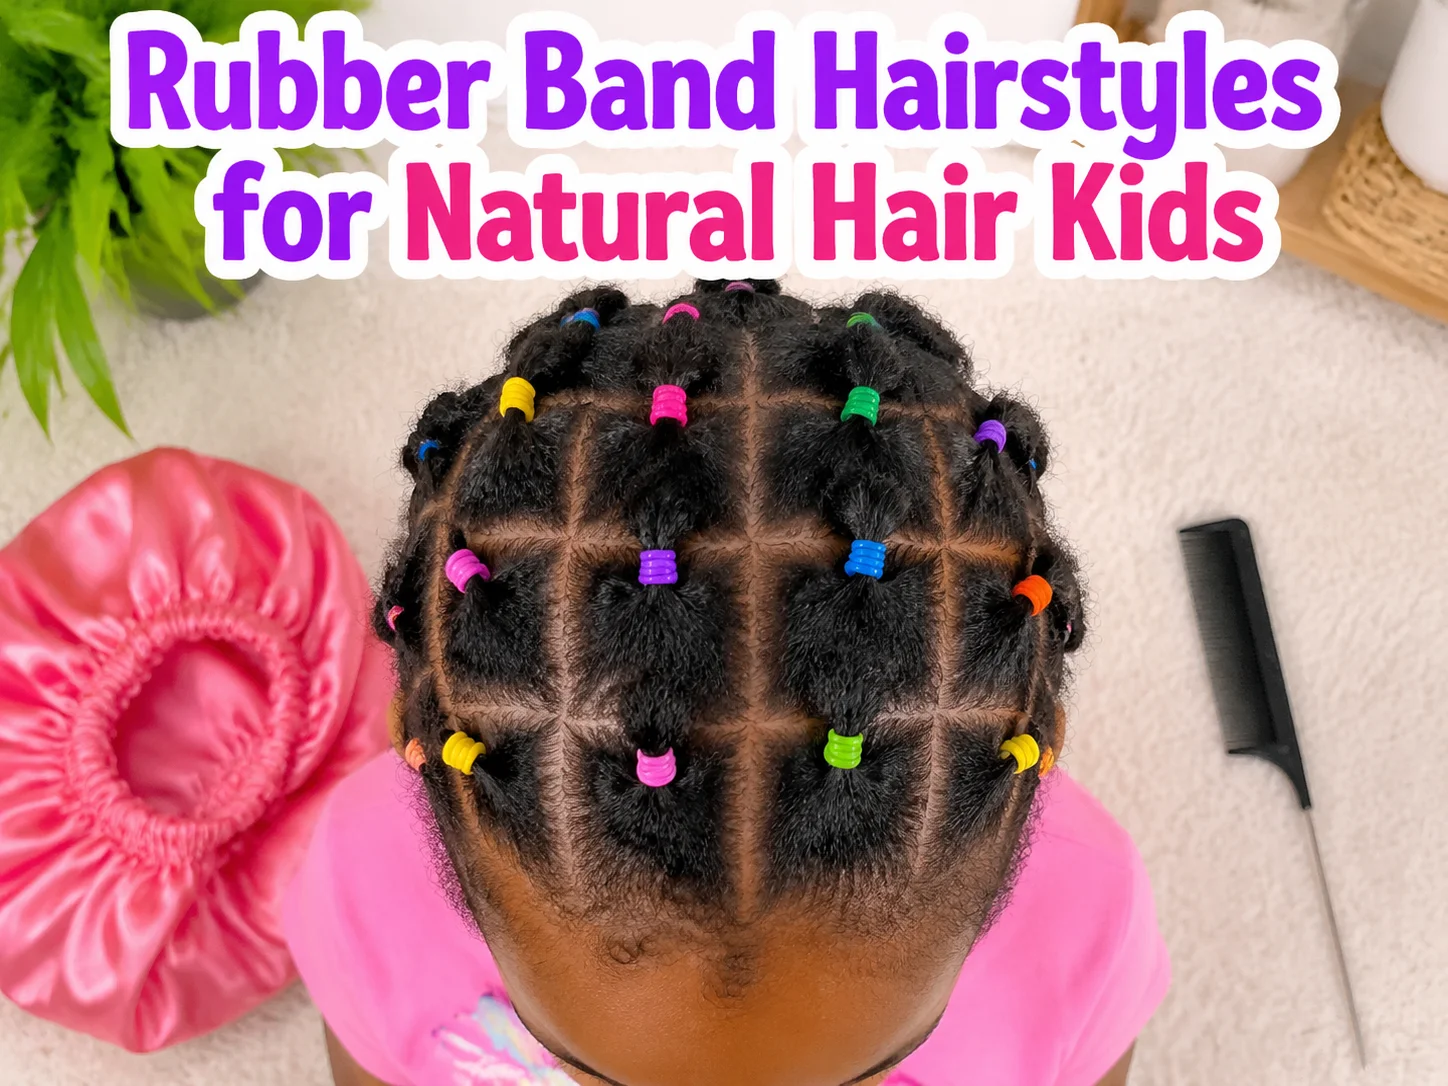
3. Rubber Band Box Sections (Chunky Grid Style)
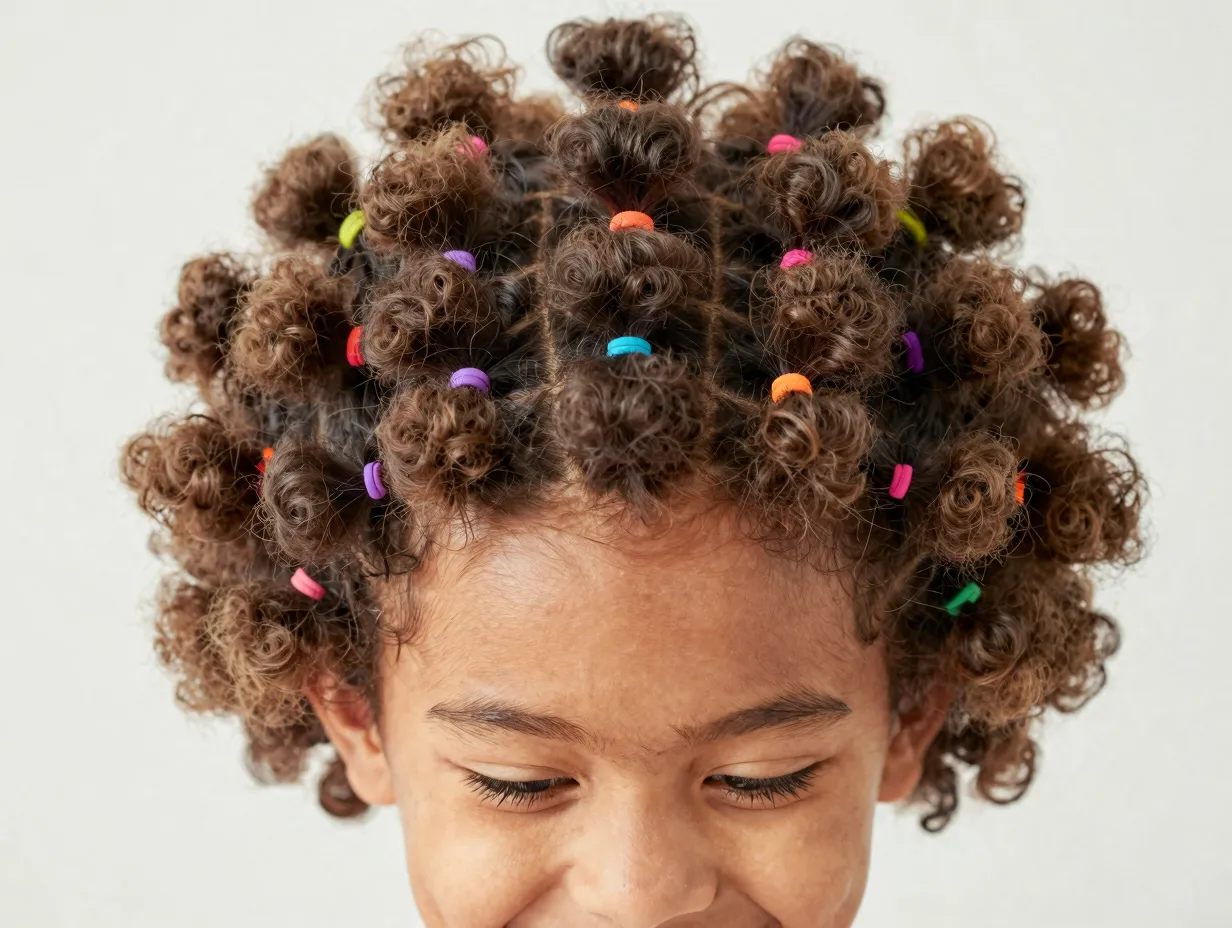
Difficulty: ⭐⭐ Beginner-Intermediate | Time: 25–35 minutes | Lasts: 5–7 days
This is one of the most visually striking and popular styles in 2026 — and it’s easier than it looks. The style involves parting the hair into neat square or rectangular sections across the entire head, securing each section with a rubber band, and leaving the hair to puff out naturally.
How to do it:
Using a rat-tail comb, part the hair into even squares or rectangles across the entire scalp. The size of the sections determines the final look — larger sections create big fluffy puffs, while smaller sections create a more detailed grid. Secure each section with one snag-free rubber band placed about half an inch from the scalp. Fluff each puff with your fingers or a pick.
Why it’s protective: Each section is contained and protected. The style requires almost no daily manipulation once set.
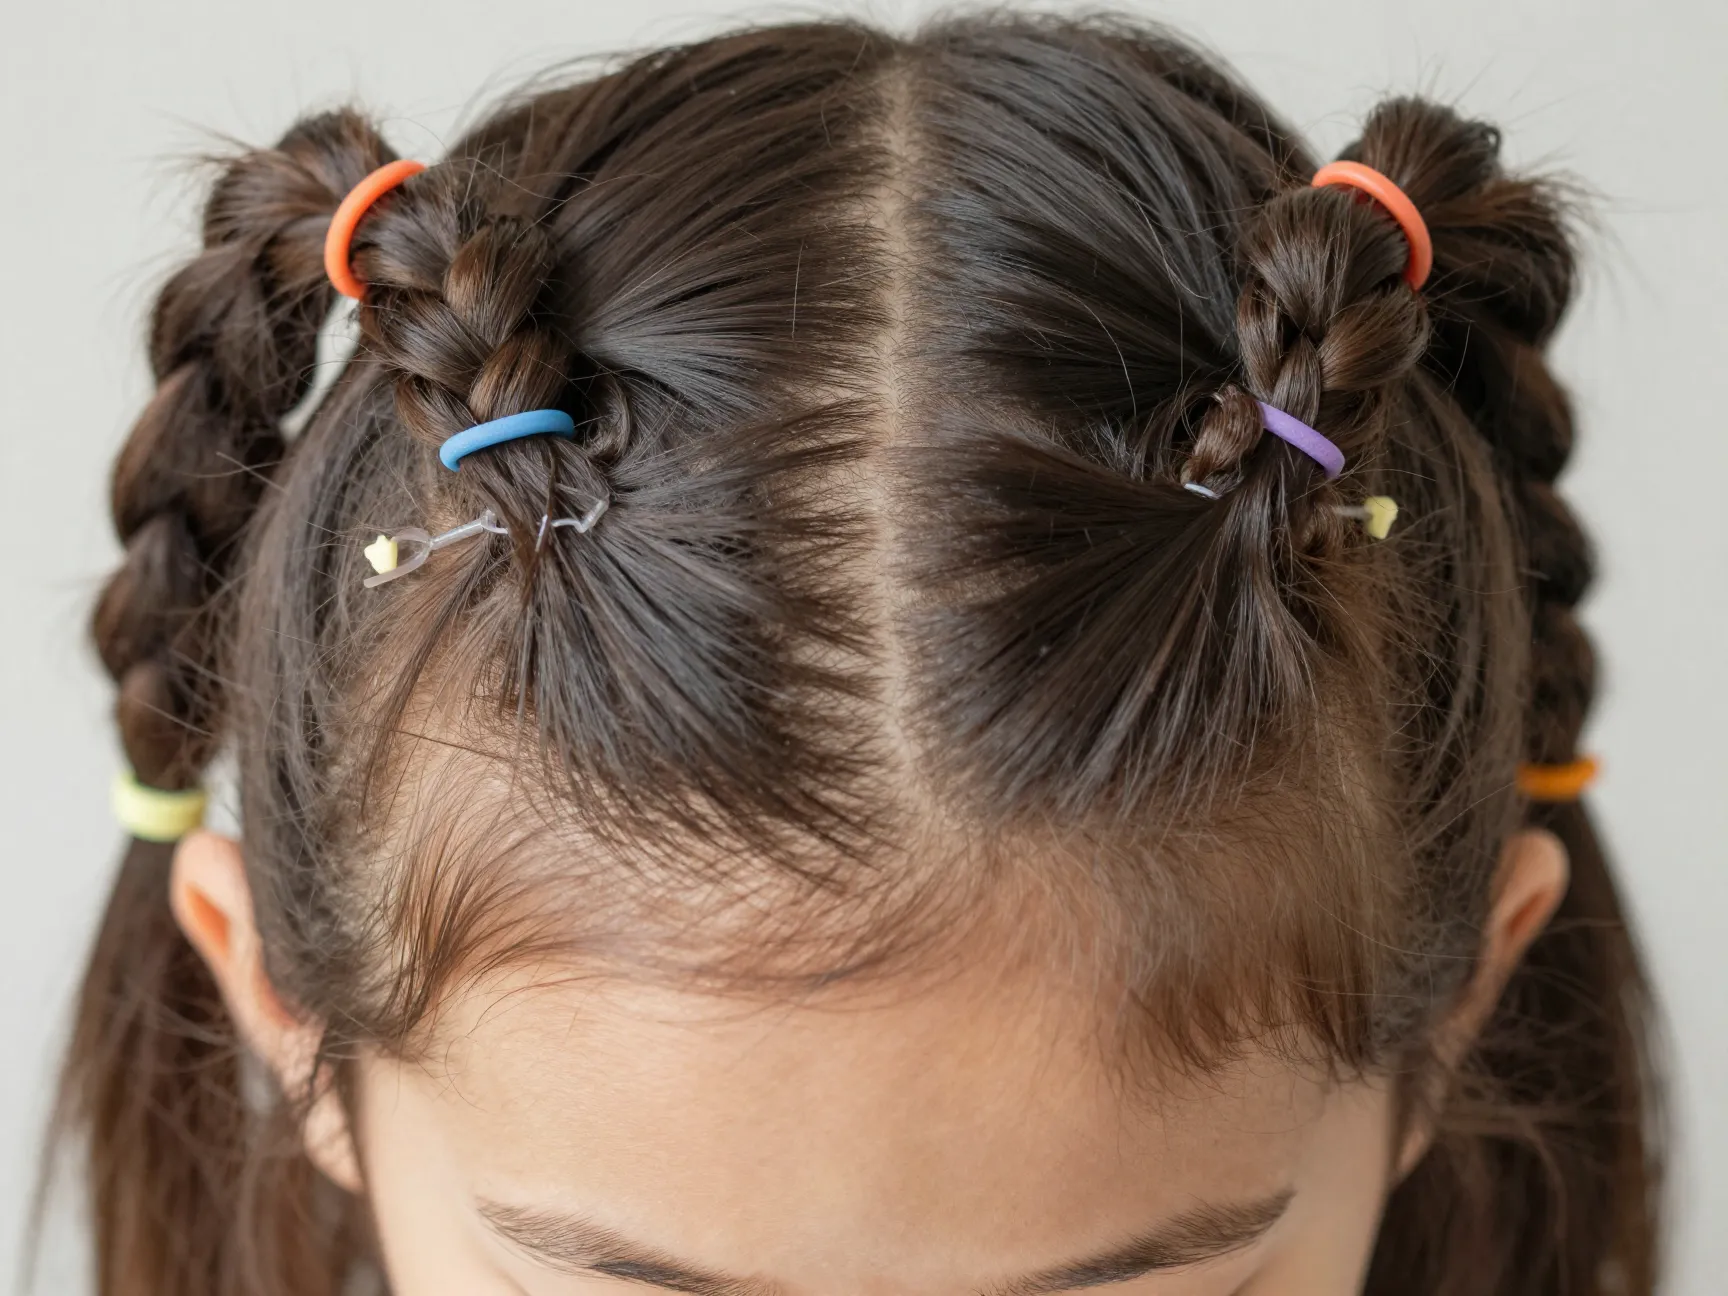
4. Rubber Band Pigtails (Double Puffs)
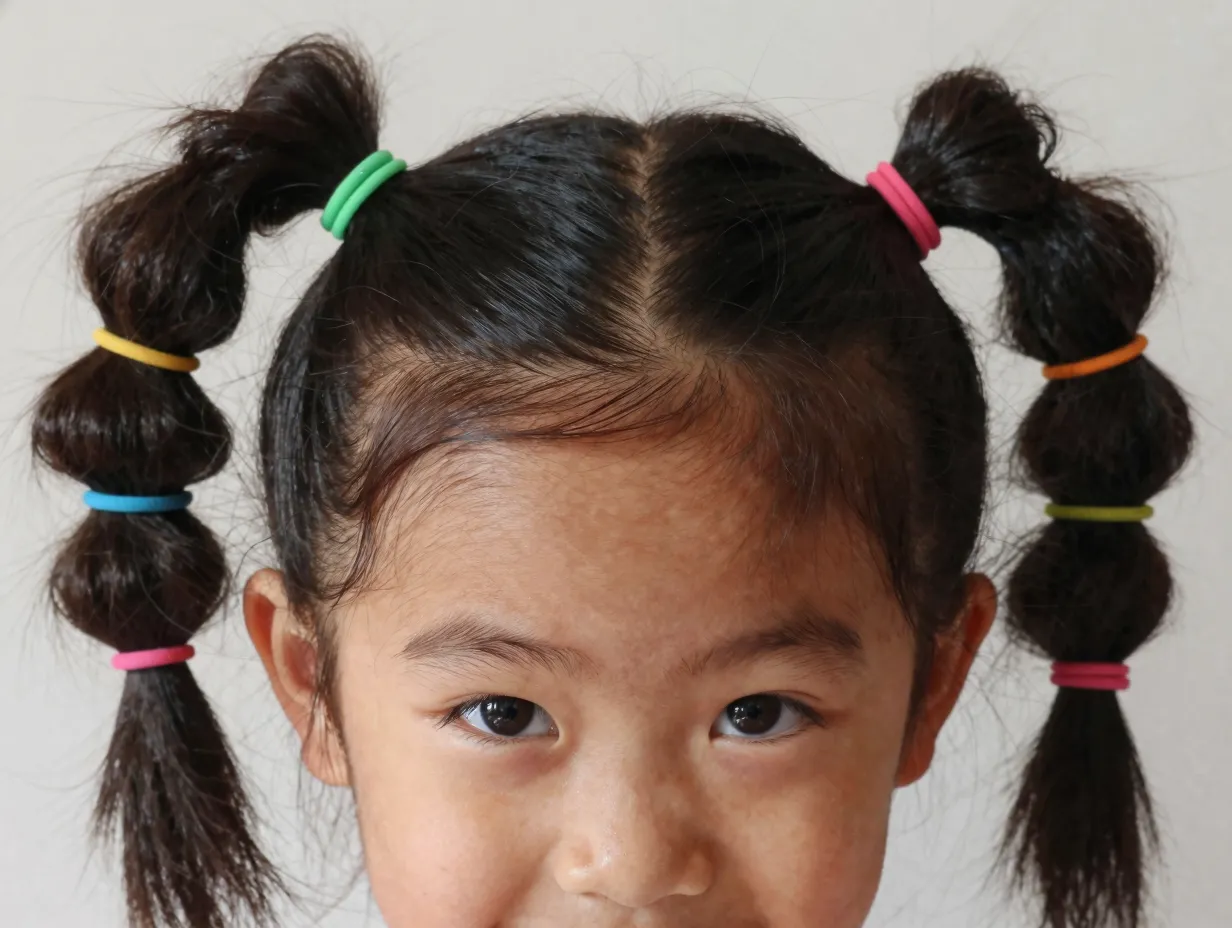
Difficulty: ⭐ Beginner | Time: 10–20 minutes | Lasts: 3–5 days
Double puffs are a timeless look for younger children and one of the fastest styles on this list. Adding rubber bands down each pigtail elevates the look and adds longevity.
How to do it:
Part the hair down the center from front to back. Secure each side into a puff with a snag-free band. For extra polish, add a second and third band down each puff, spacing them evenly. Finish with a light oil on the scalp and edges.
Why it’s protective: The style keeps both sides contained, reducing tangling and frizz. The banding technique prevents the puffs from unraveling throughout the day.
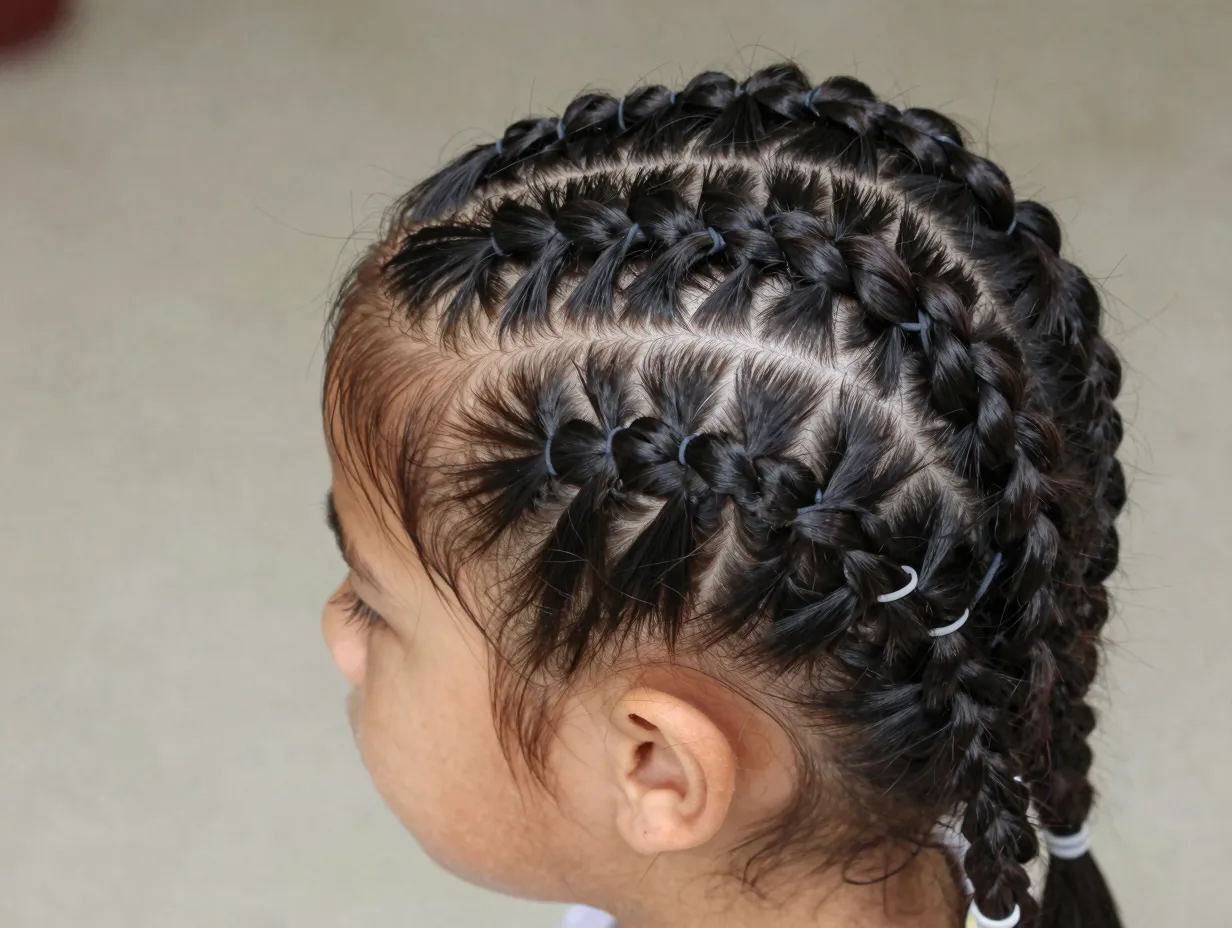
5. Criss-Cross Rubber Band Pattern
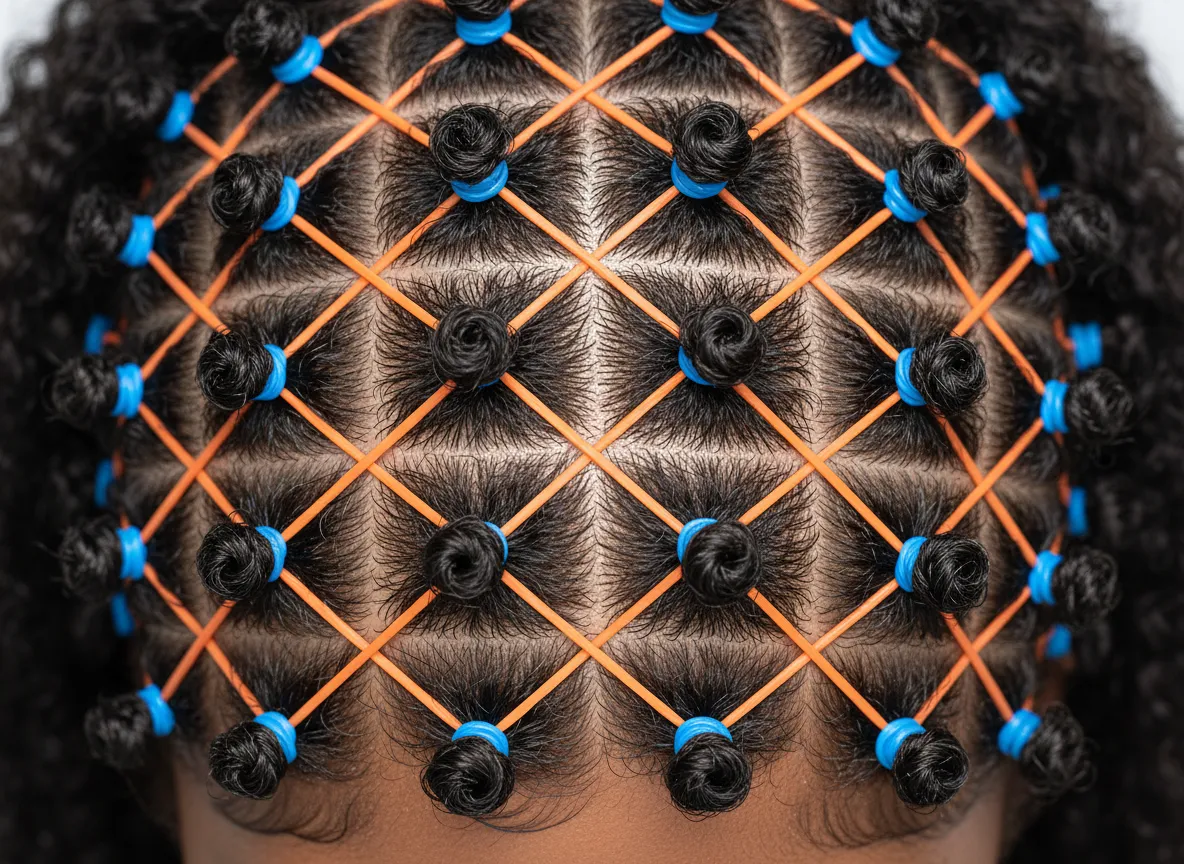
Difficulty: ⭐⭐⭐ Intermediate | Time: 35–50 minutes | Lasts: 7–10 days
The criss-cross rubber band style is one of the most visually impressive options in this collection of 8 easy & protective rubber band hairstyles for natural hair kids. It involves creating a geometric, woven pattern across the scalp using rubber bands that connect sections diagonally.
How to do it:
Part the hair into a grid of even sections (start with a 3×3 or 4×4 grid). Secure each section with an initial rubber band. Then, take half of one section and half of the adjacent section and join them with a new rubber band, placed slightly lower on the scalp. Repeat this process across the entire head, alternating the joining pattern to create a diamond or criss-cross effect.
Why it’s protective: The interlocking pattern distributes tension across multiple points rather than concentrating it at one spot, which is gentler on the scalp. The style also keeps every strand contained for extended wear.
Styling tip: Use two contrasting colors of rubber bands — one for the initial sections and one for the joins — to make the pattern pop. 🎨
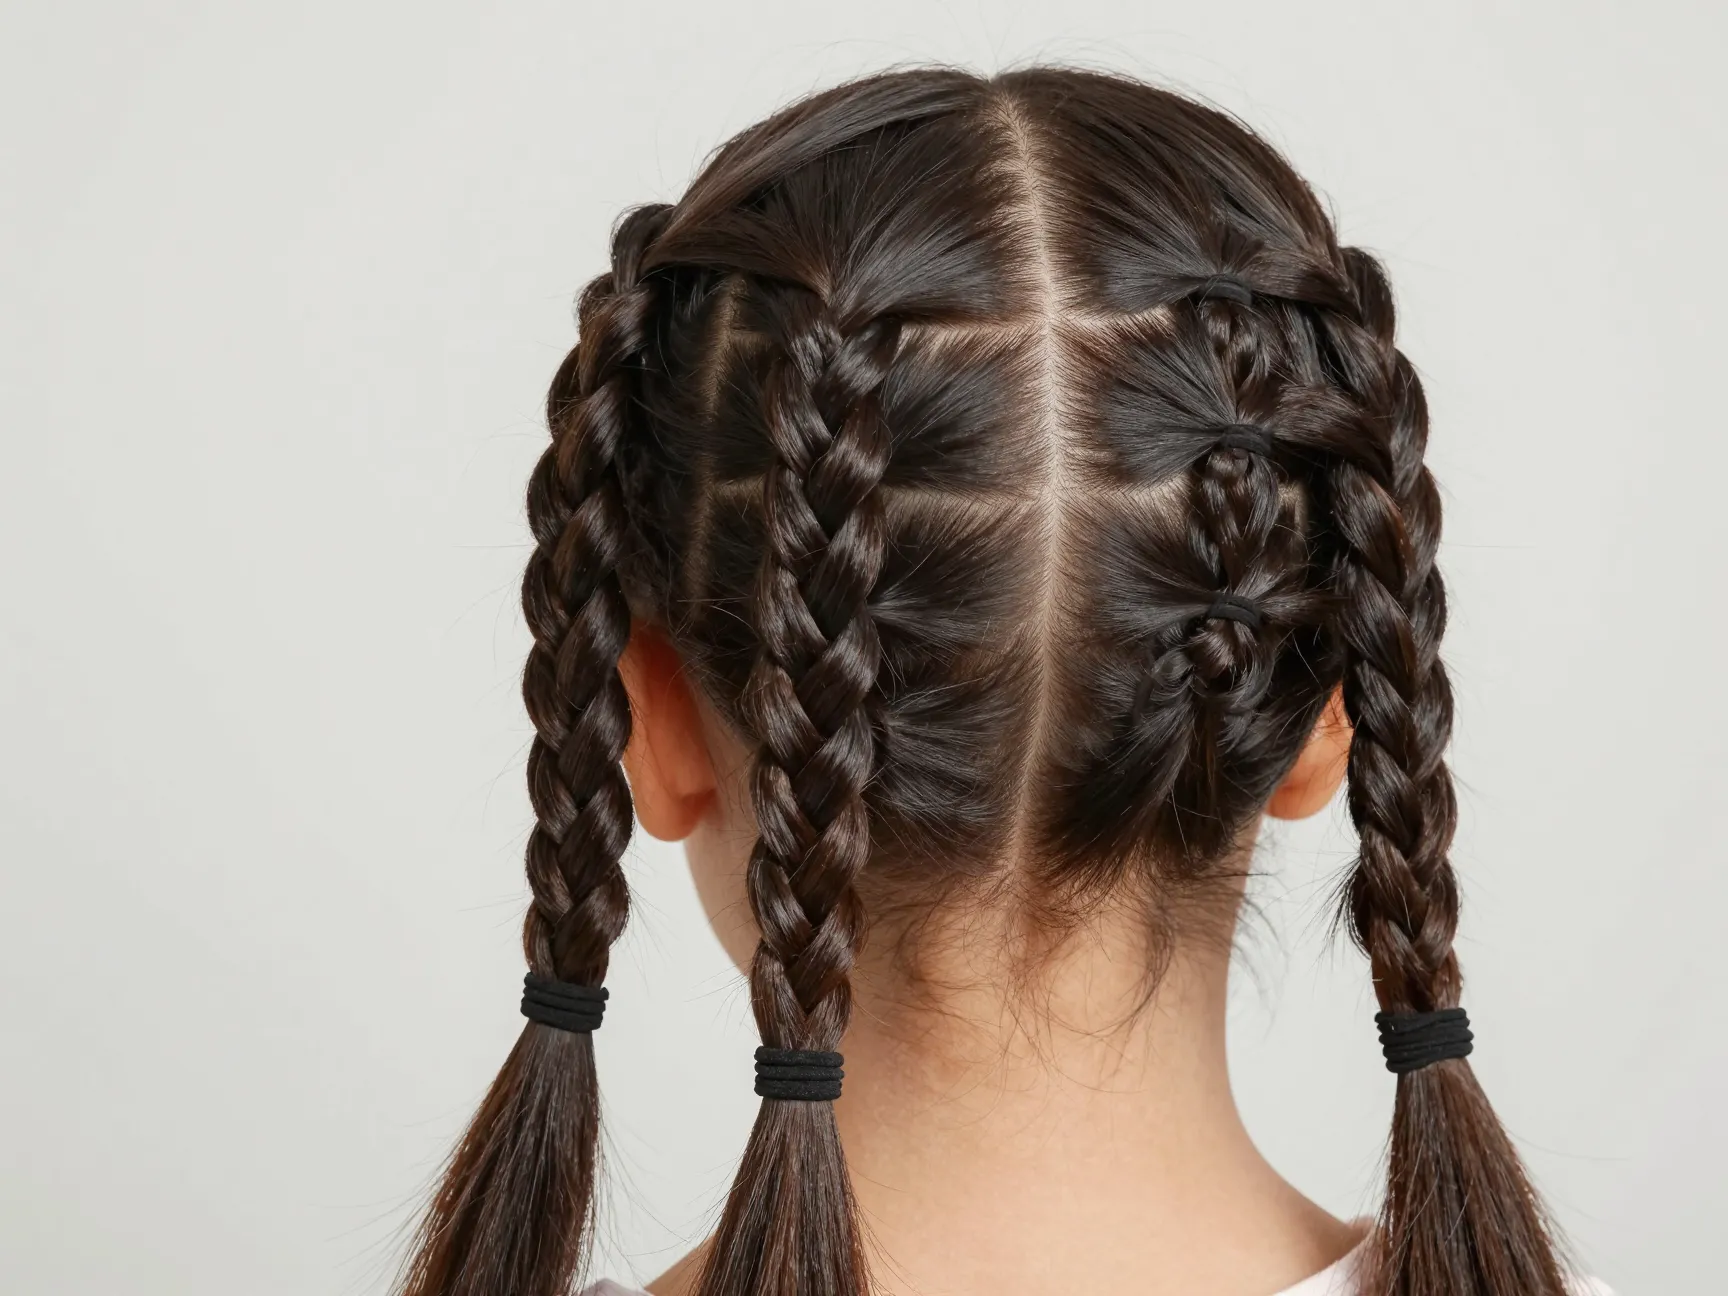
6. Rubber Band Cornrow Substitute (Feed-In Bands)
Difficulty: ⭐⭐ Beginner-Intermediate | Time: 20–30 minutes | Lasts: 5–7 days
Not every parent is comfortable braiding cornrows, and that’s completely okay. This style mimics the clean, linear look of cornrows using only rubber bands — no braiding skills required.
How to do it:
Part the hair into three to five horizontal rows from front to back. In each row, create a small section at the front and secure it with a rubber band. Take the next small section behind it, add it to the first ponytail, and secure with another band slightly lower. Continue “feeding” sections into the growing ponytail all the way to the nape. The result is a cascading, cornrow-like line of banded hair.
Why it’s protective: Like traditional cornrows, this style keeps hair flat and contained along the scalp. It’s especially good for active children who play sports or swim.
7. Rubber Band Crown with Free-Hanging Ends
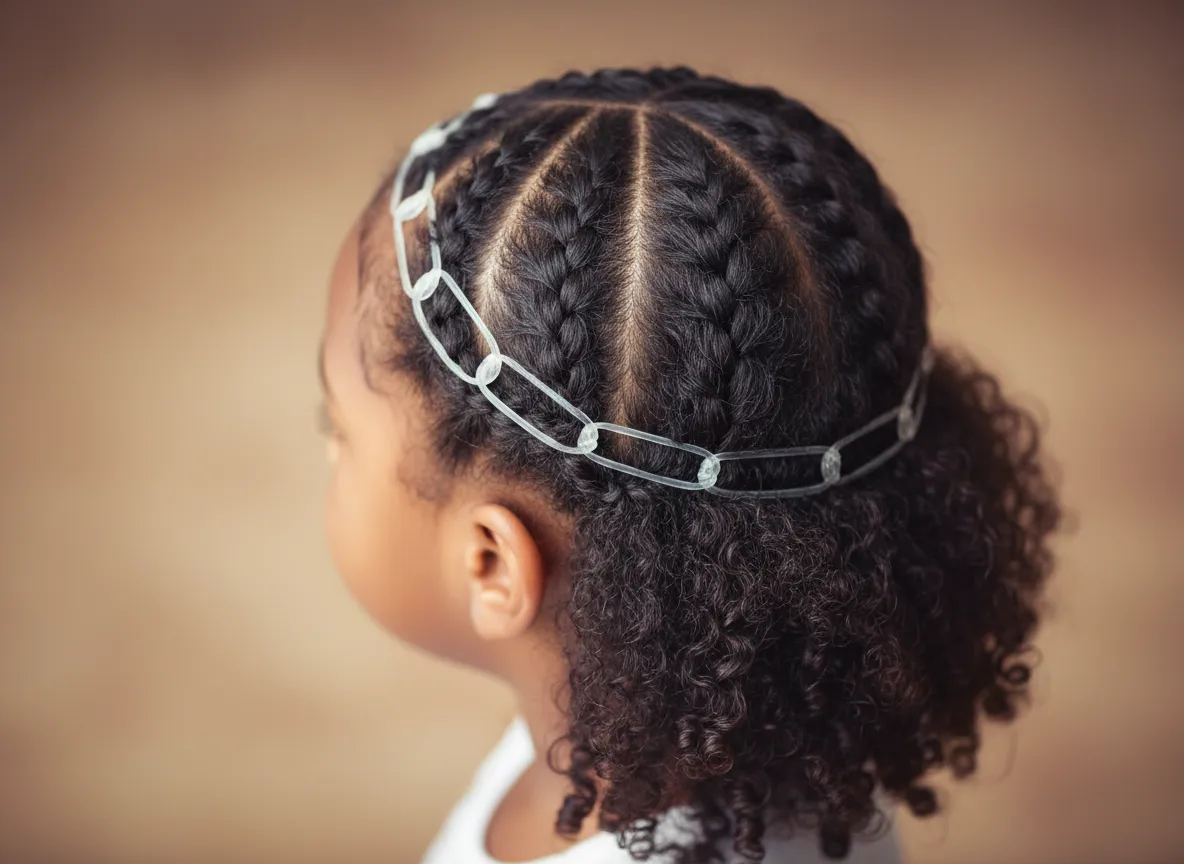
Difficulty: ⭐⭐⭐ Intermediate | Time: 40–55 minutes | Lasts: 7–10 days
This style creates a beautiful crown effect around the perimeter of the head, with the remaining hair left to hang freely in the center. It’s elegant enough for special occasions but durable enough for everyday wear.
How to do it:
Part the hair around the perimeter of the head — think of it as creating a “halo” section. Divide this perimeter section into six to eight smaller sections and secure each with a rubber band. Then connect adjacent sections with a second rubber band to create the crown chain. Leave the center hair loose, or style it into a puff, twist-out, or braid-out for added texture.
Why it’s protective: The crown sections protect the most fragile perimeter hairs — the edges and nape — which are most prone to breakage from friction and manipulation.
Styling tip: Add small beads or barrettes to the hanging ends of the crown sections for a festive finish. ✨
8. Full-Head Rubber Band Braid Extensions
Difficulty: ⭐⭐⭐⭐ Advanced Beginner | Time: 60–90 minutes | Lasts: 10–14 days
This is the most involved style in our list of 8 easy & protective rubber band hairstyles for natural hair kids, but it’s also the longest-lasting and most protective. It involves sectioning the entire head, creating simple three-strand braids in each section, and securing them with rubber bands at both the root and the ends.
How to do it:
Section the entire head into even squares or rectangles (the size depends on how many braids you want). Secure each section at the root with a snag-free band. Braid each section into a simple three-strand braid all the way to the ends. Secure the end with another snag-free band. For extra length and variety, you can add a small amount of braiding hair at the root before braiding.
Why it’s protective: With the ends fully secured and the hair braided, this style offers maximum protection for the entire hair shaft. It’s ideal for summer, swim season, or any period when you want to give the hair a long rest from daily manipulation.
Maintenance tip: Refresh the scalp every 3–4 days with a light oil or scalp spray. Sleep with a satin bonnet every night to extend the life of the style.
Maintenance Tips to Make Every Style Last Longer
Getting the style in is only half the work. Here’s how to protect your investment:
Nightly care:
- Always use a satin or silk bonnet or pillowcase at night.
- Avoid cotton scarves, which absorb moisture from natural hair.
Mid-week refresh:
- Lightly mist the scalp with a water-based refresher spray.
- Apply a small amount of light oil to the scalp (not the hair shaft) to prevent dryness.
Removing rubber bands:
- Never pull rubber bands out — always cut them with small scissors or a seam ripper.
- Work slowly and add a little oil to the bands before removal if they feel stuck.
When to take the style down:
- Most rubber band styles should come down after 7–14 days maximum.
- If you notice significant frizz, matting at the roots, or scalp irritation, take the style down earlier.
Frequently Asked Questions
Are rubber bands bad for natural hair?
Standard rubber bands with metal clasps absolutely can cause breakage. However, snag-free, no-metal elastics are safe for natural hair when applied with appropriate tension — not too tight, not too loose.
What age is appropriate for rubber band styles?
These styles are suitable for children of all ages, including toddlers. For very young children (under 2), keep styles loose and simple, and avoid any tension near the hairline.
How do I prevent rubber bands from matting in the hair?
Apply a light oil to each section before placing the band. This creates a slip barrier that prevents the band from gripping the hair shaft too tightly.
Can rubber band styles be done on wet or dry hair?
Both work, but stretched or blow-dried hair typically gives the cleanest results. Wet hair can cause bands to grip too tightly as the hair shrinks during drying.
Conclusion: Start Simple, Build Confidence
The 8 easy & protective rubber band hairstyles for natural hair kids in this guide represent a spectrum — from the 10-minute classic ponytail to the two-week full-head braid style. The best place to start is wherever your current skill level and your child’s patience allow.
Your actionable next steps:
- Buy the right supplies — snag-free bands in multiple colors, a rat-tail comb, and a good leave-in conditioner are all you need to start.
- Try Style 1 or Style 4 first — the classic ponytail and double puffs are the most forgiving for beginners.
- Practice sectioning — clean, even sections are the single biggest factor in how professional any style looks.
- Invest in a satin bonnet — this one tool can double the lifespan of any style you create.
- Document your progress — take photos after each style so you can track improvement and build a reference library of what works for your child’s specific hair texture.
Natural hair care is a skill, and like any skill, it gets easier and faster with practice. Every style you complete is a step toward building a positive hair care routine that your child will carry into adulthood. 💪🏾